Get started with Chatra
Chatra is a functional, easy to use piece of chat software for websites that allows your customers to contact you in real-time via live chat or message you when you are offline, so you can answer their questions, solve any problems and help them make purchases.
This guide will help you set up Chatra live chat on your website and tell you how to get the most out of it.
Includes guide
to targeted chats
& behavioral triggers
First steps
Place the Chatra widget code on your website
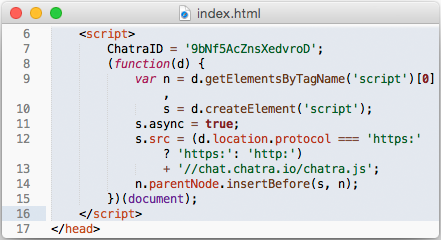
In order for Chatra to start working, you need to place our widget code on your website. You can find your code in the “Chat Widget” section of the operator dashboard.
Check out our installation guides for some of the most popular content management systems (WordPress, Shopify, Joomla, Drupal, Wix etc.) and Google Tag Manager. If you need help or can’t get something to work, chat with us and we’ll talk you through it.
Set up your account
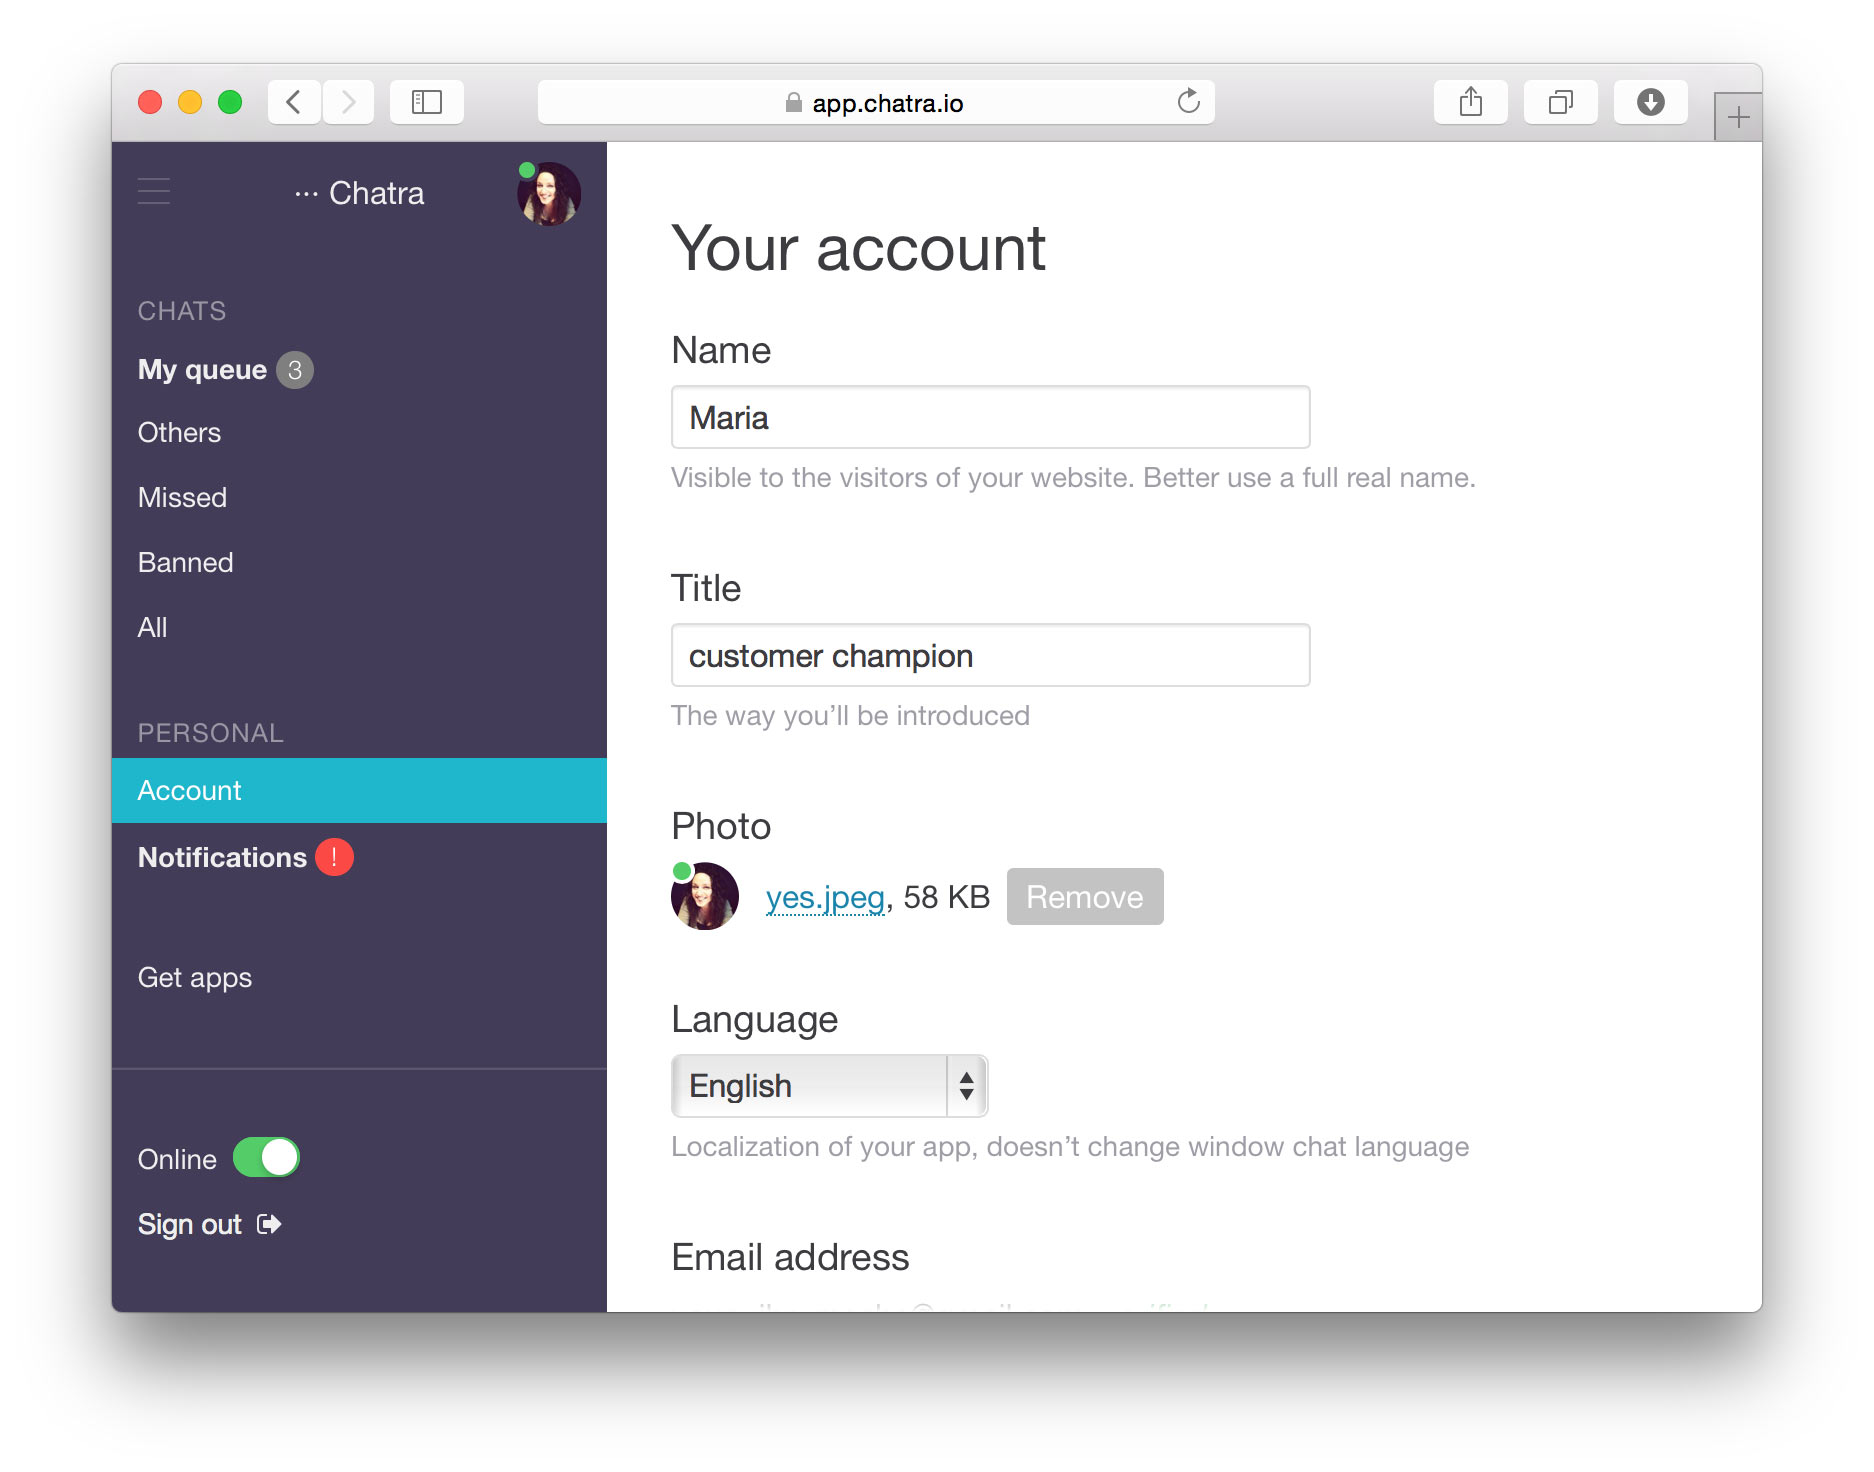
Fill in your name (we recommend either using your full name or omitting your family name entirely, e. g. Katy or Katy Brown, but not Katy B), title and upload a real photo for an avatar.
A friendly, informal picture will build much more trust than a stock photo of someone with a headset mic and incredibly white teeth!
Invite your teammates
Invite your teammates by sending invitations from the “agents” section. Each member of the team can either be an administrator or agent. The latter don’t have access to Chatra settings.
Understand online and offline modes
Live chat and messenger modes
When you or your colleagues are online, chatra works as a live chat, but switches to a messenger mode when you are offline or invisible.
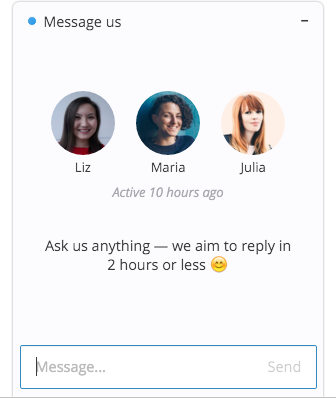
Status indicator is shining blue and one can see your team avatars and time of the last activity – all these things make the widget look “alive” even when agents are not available.
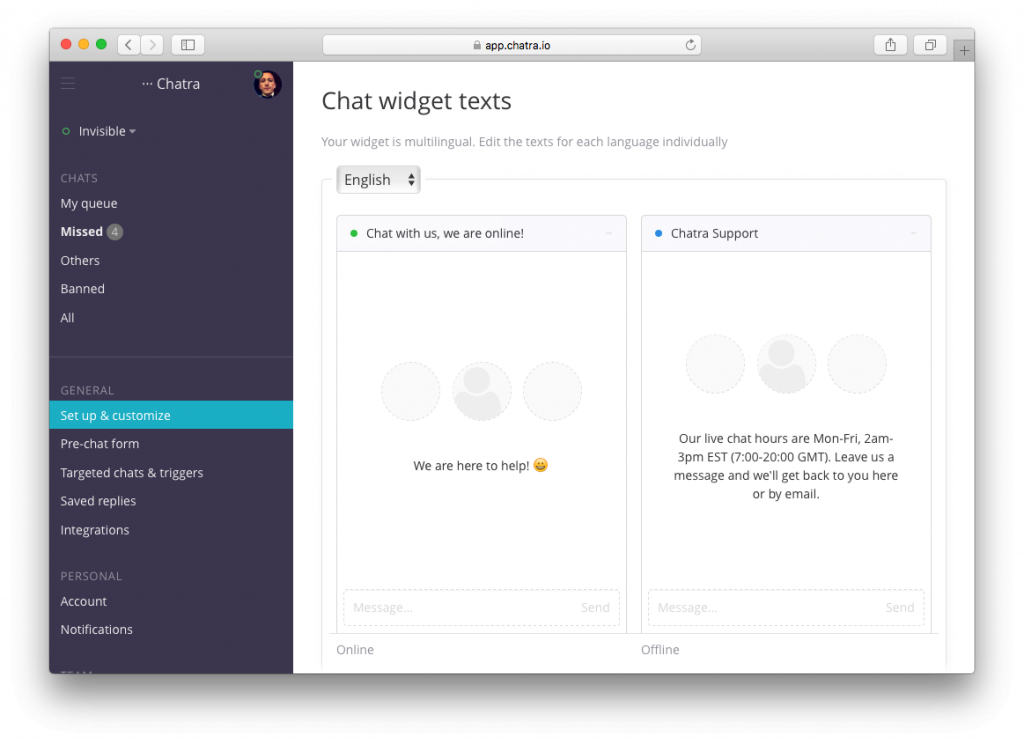
It’s not necessary to say that you are offline, but you can let your customers know that they should not expect an immediate answer. The texts for online and offline invitations can be edited in “Widget → Chat widget texts” section:
Get notified
Chatra can send you both desktop and mobile push notifications. If you are logged in both on desktop and mobile devices, a mobile push notification will be delayed by 30 seconds to give you time to react on desktop first.
When online – you will receive notifications immediately and live chat with visitors in real time.
When invisible – you will not be receiving notifications about new chats until you are invited to join a conversation by another agent. For more information about the invisible mode, check this section.
Note, that if all agents are invisible, the widget goes into the offline, “messenger” mode.
When offline – you will get no notifications at all. You can still receive messages from your visitors and reply to them from Chatra or an email client of your choice.
Get technical with proactive chats and behavioral triggers!
Targeted, or proactive, chats are a great tool to maximize the number of sales and/or leads, as well as minimizing bounce rate. They allow you to contact a customer proactively, as soon as they have a problem.
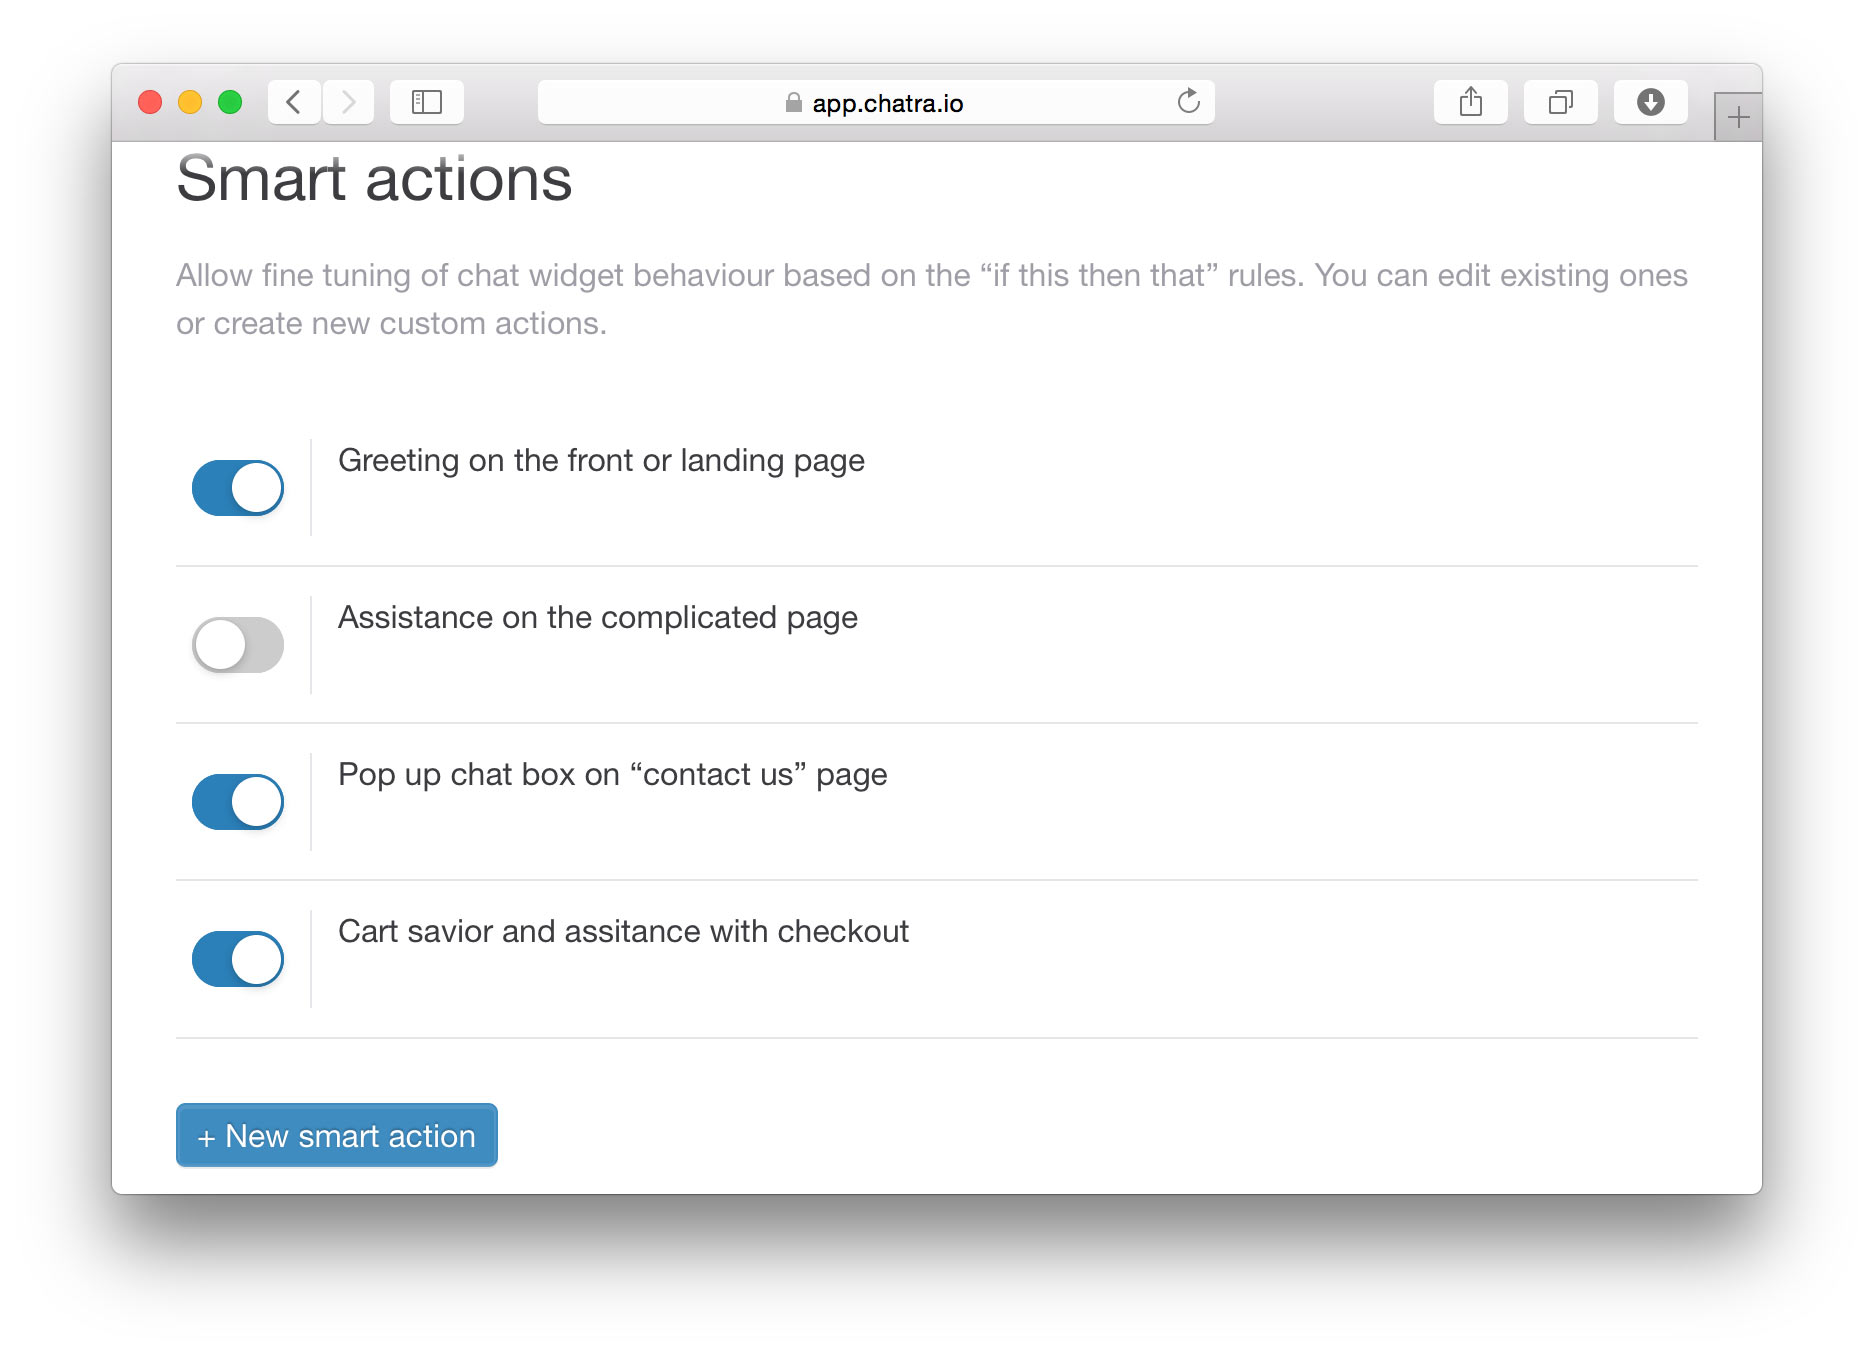
We’ve created default templates for some of the most important triggers, so all you need to do is enter a few details to start using them.
Polite, but informal text works best; actually helping customers find what they want is much more effective than bombarding them with corporate buzzwords.
To turn proactive chats on, you need to enter URLs of webpages they should appear on and edit the text according to your website content. For example, a skateboard shop might use “What kind of board/wheels/trucks are you looking for?” rather than a generic “How can I help?”
In most cases, it’s not a good idea to contact the customer as soon as they land on the page. Many might consider this intrusive, so we’ve set up triggers in a way that avoids that. Chats won’t pop up too often, and there is a delay before they do.
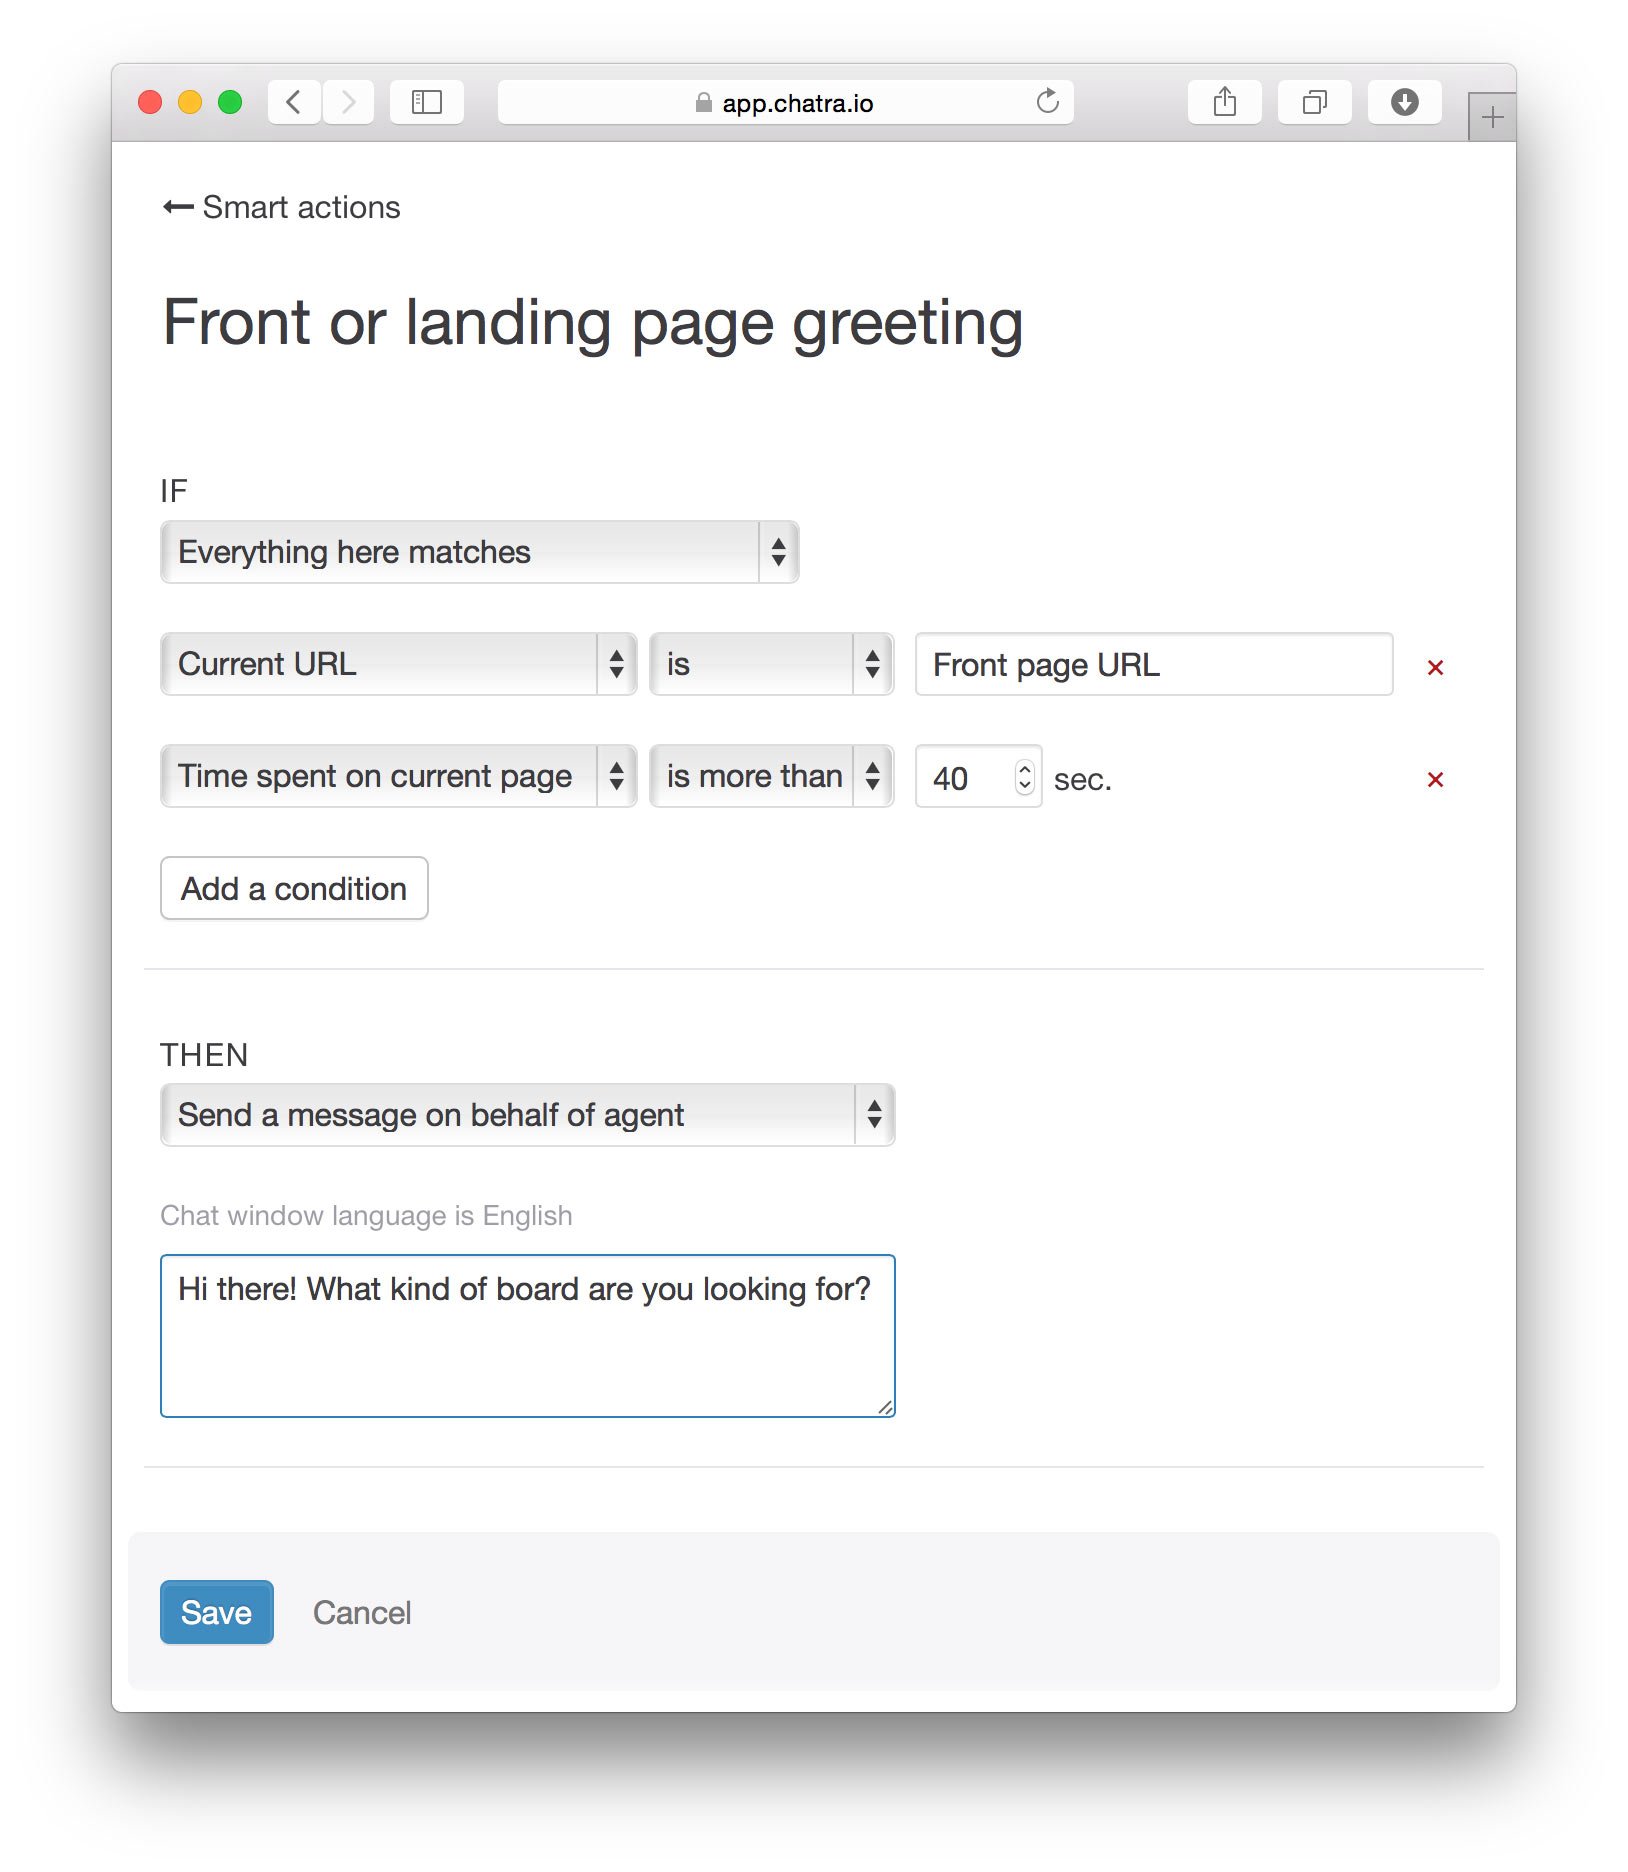
Front or landing page greeting
Visitor stuck on the first page and not moving anywhere? Contact them before they leave to ask how can you help and provide links to the popular pages of your website. In order to switch this on, enter your homepage or landing page URL in the corresponding field.
If you have more than one landing page, make a copy of this triggered action for each one, customizing the text to match landing page copy.
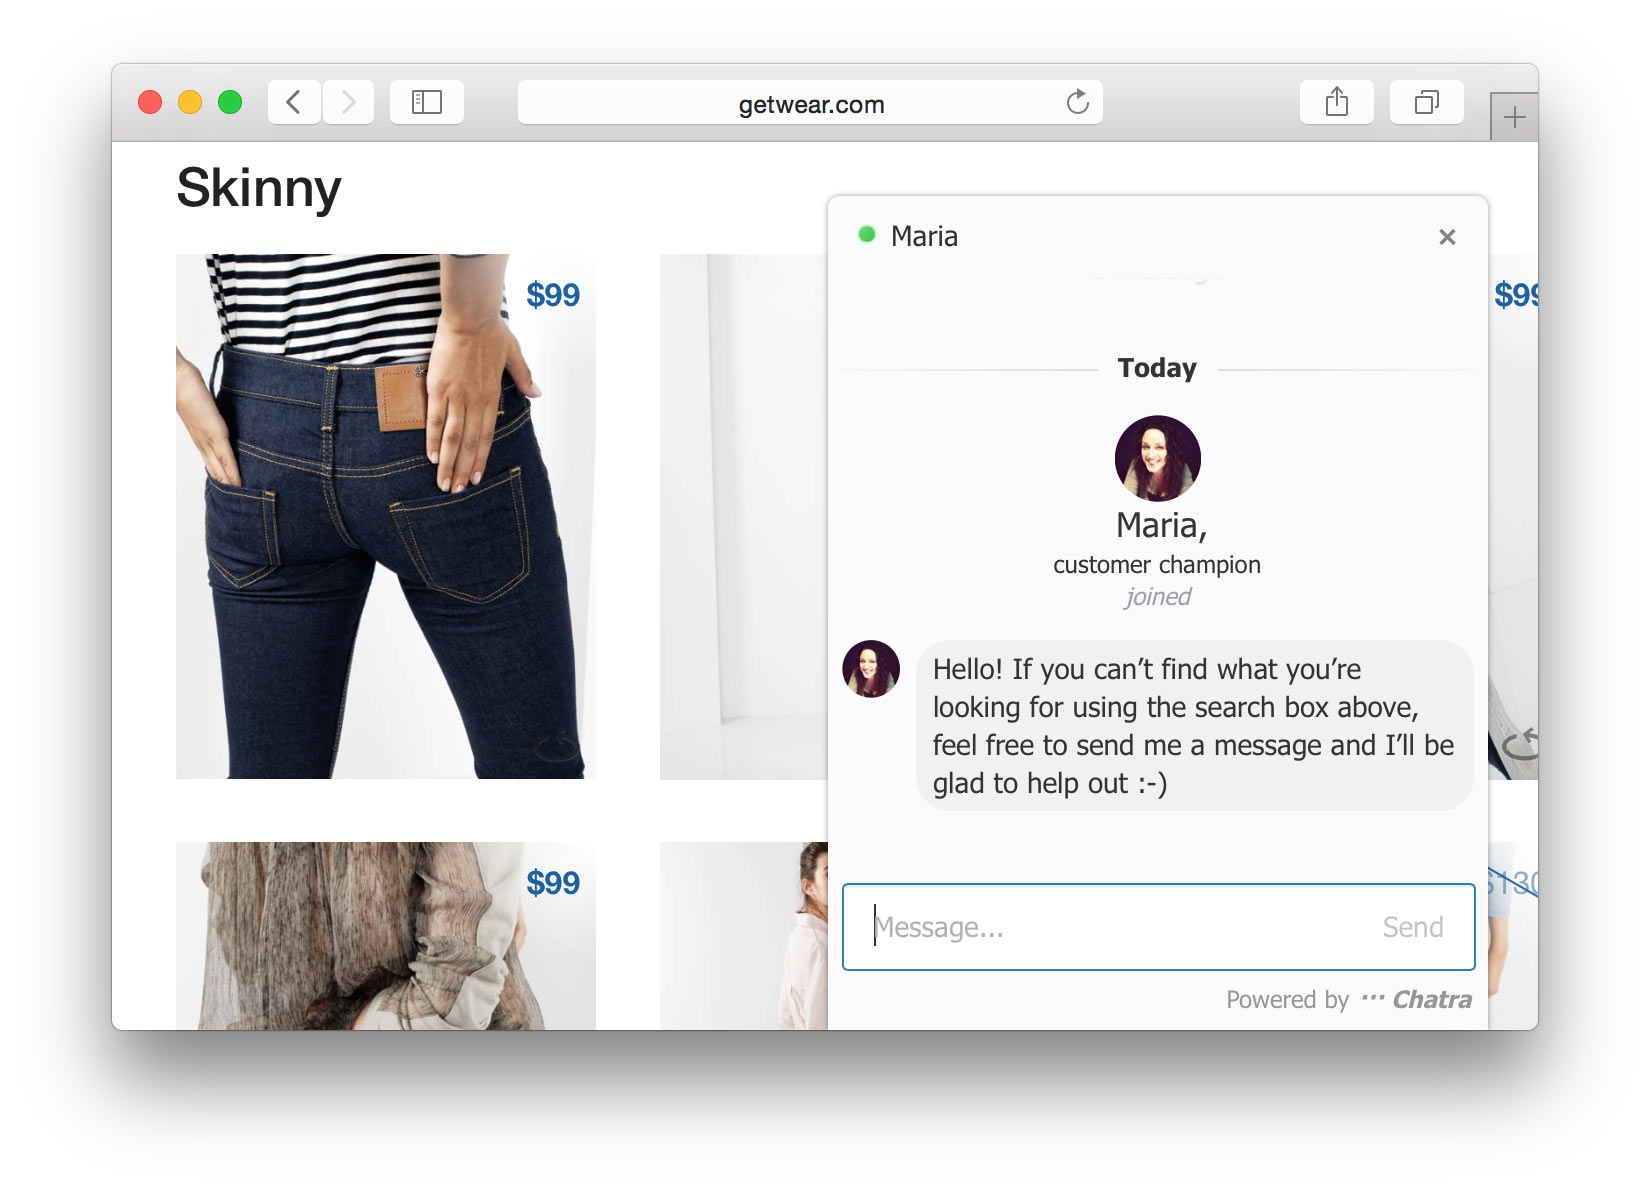
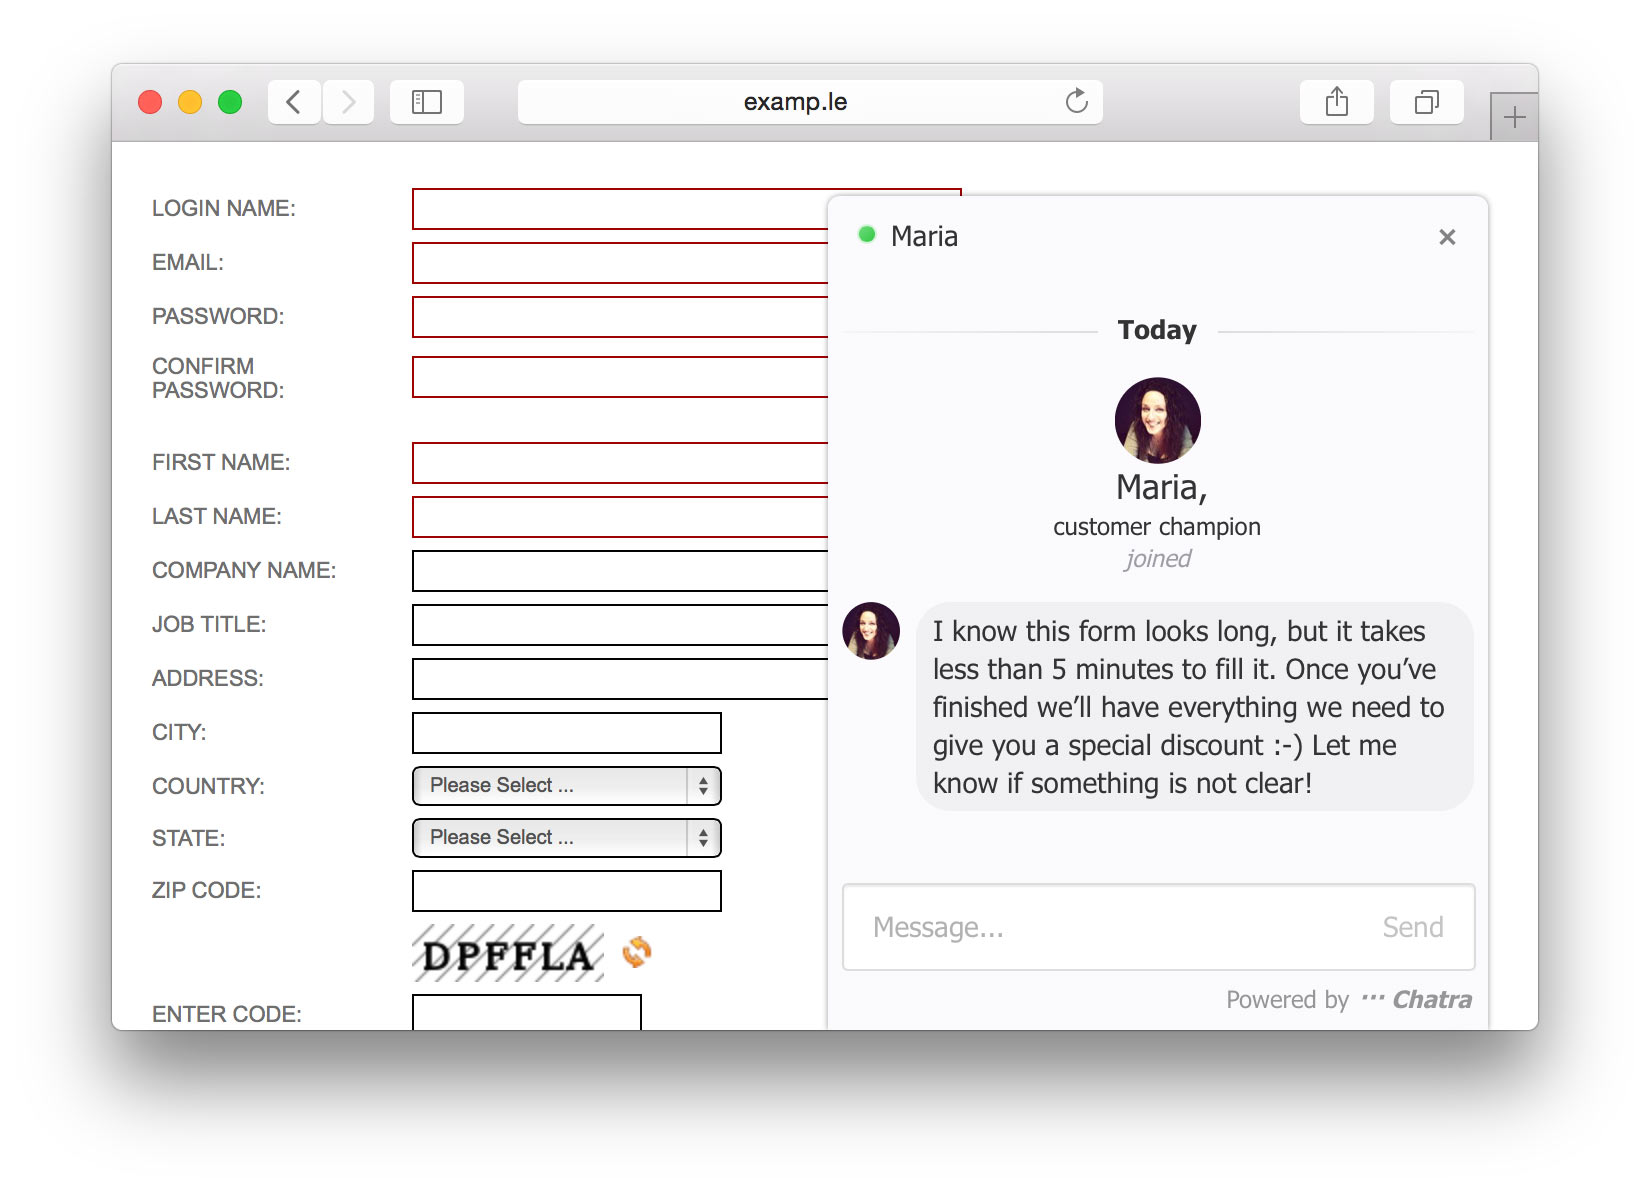
Assistance on complicated pages
Certain pages on your website seem to trip people up or leave them confused? Maybe there’s a long form visitors need to fill in? Offer your help before they leave the page or get frustrated.
Again, just enter the URL and customize the text, copying it over for other landing pages if necessary.
Open chats on a “contact us” page
Visitor looking for the easiest way to contact you? Pop up a chat window and they can contact you in a breeze, rather than having to wait for an email back. Just enter the URL for your “contact us” page.
Cart saving and checkout assistance
According to research, customers abandon around 68% of shopping carts (source). You can generate significantly more orders just by inviting visitors who have been on the cart page for some time to chat.
Enter the checkout/shopping cart page URL and turn on the trigger. We think that’s probably one of the places Chatra can help you the most.
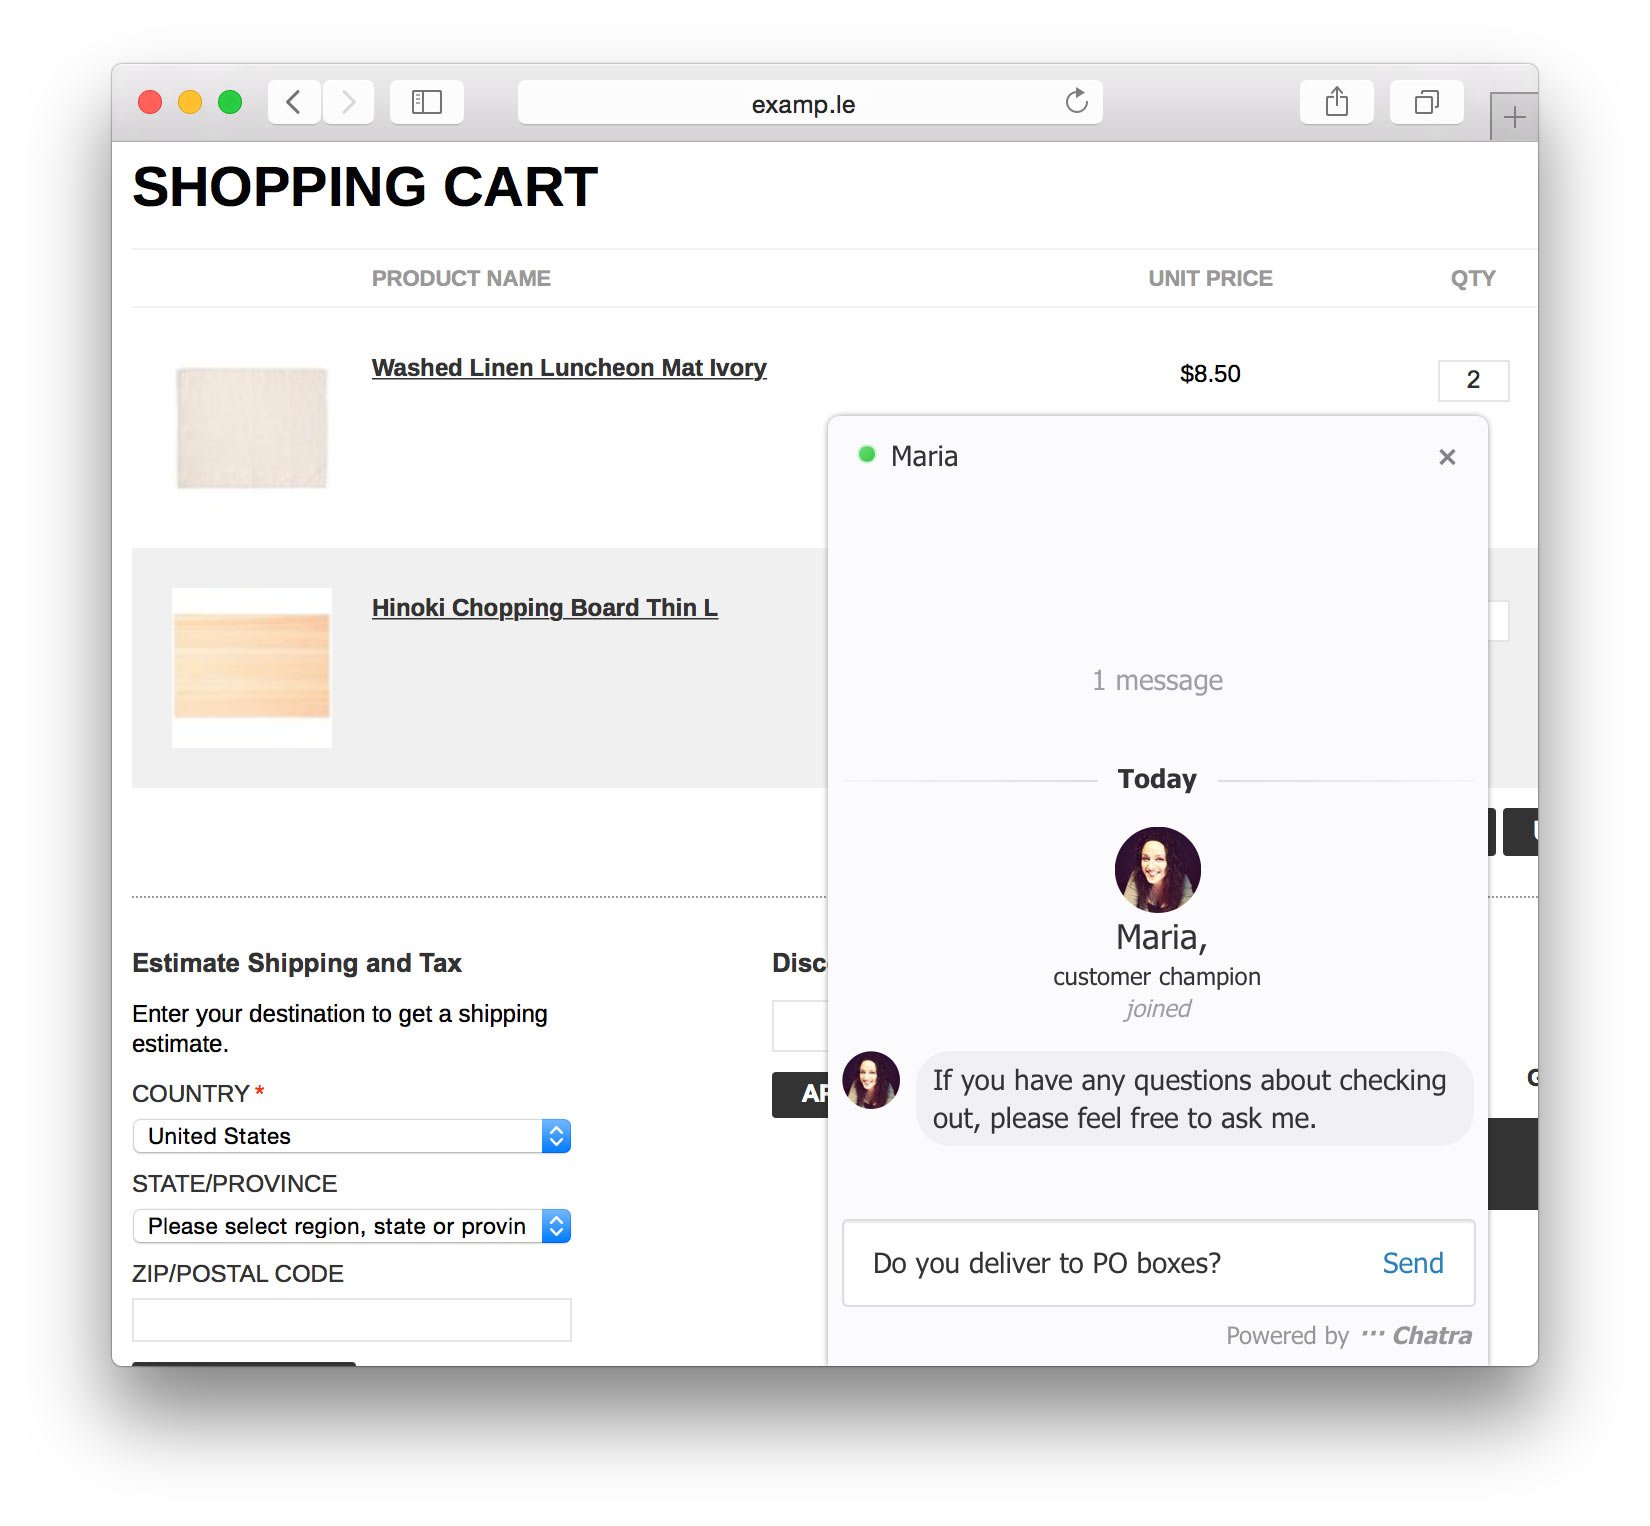
You can set each pro-active chat to appear in the live chat (online) or messenger (offline) modes or both.
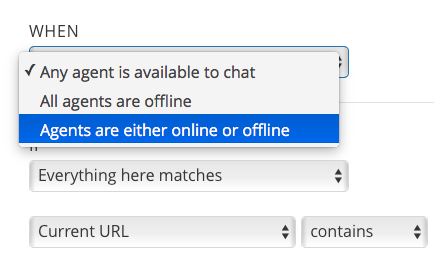
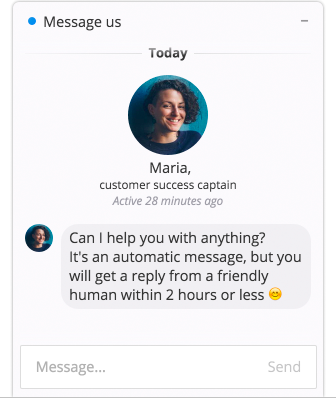
When sending targeted chats while offline, it might be good to add something like “We’ll be in touch soon” to the message:
Real-time visitor list
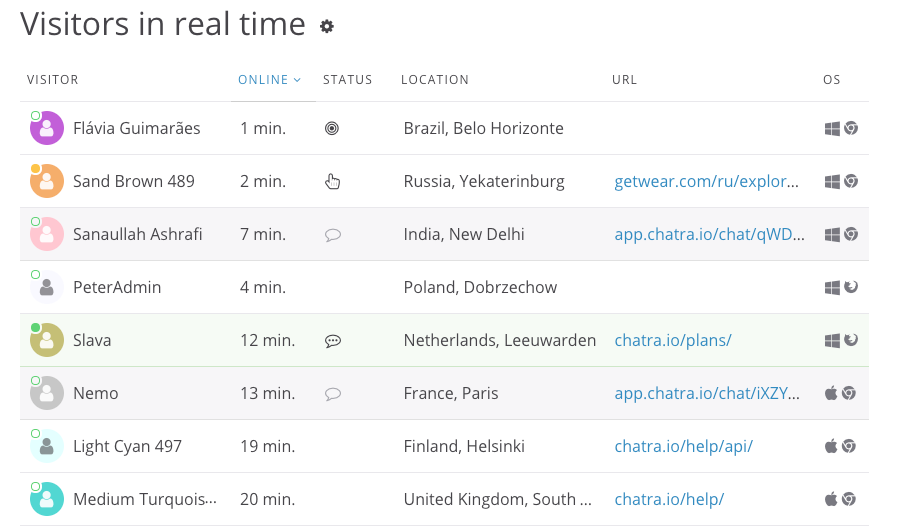
View the list of visitors who are currently online on your website and start a conversation manually. This gives you a possibility to target customers from particular location or those that have put some items in their Shopify cart. Don’t be shy to be the first one to start the conversation – customers love personal attention.
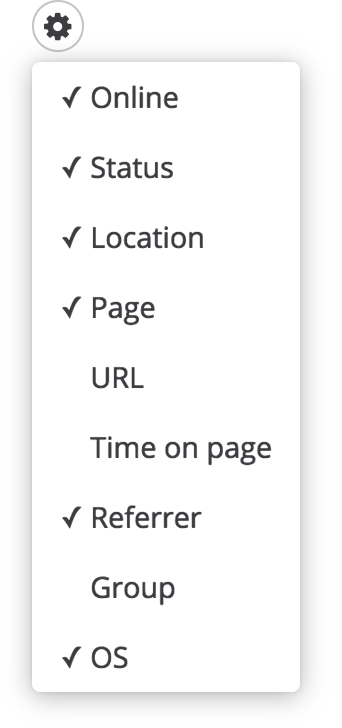
Choose what kind of information about visitors you want to see in the list: location, current page, referrer, OS/browser, etc:
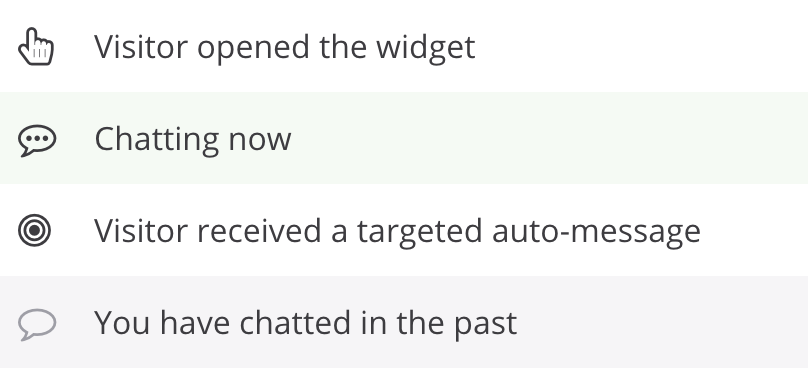
Visitors highlighted in gray chatted with your earlier. Pale green color means that they are chatting with you right now. In the “Status” column you will see icons which will help you understand if a visitor has past conversation history with you, have received a proactive chat invitation or opened the chat window:
The number of visitors displayed in the list depends on the number of paid agent seats on your plan: 10 online visitors for each agent seat.
Chat Bot
Our chatbot works like this: the bot automatically sends a message to a visitor with a question or an offer and gives a visitor several reply options to choose from. A visitor chooses the preferred option, and the bot sends them the next automatic message. After that message, the bot may offer some reply options again. This scenario continues until the sequence of bot messages and visitor’s reply options ends, or until a visitor chooses an option to connect to an agent and gets transferred to someone from your support team.
To create a bot scenario, go to the Automated answers tab and click on the +New scenario button. Enter the initial bot-message where you can greet the visitor and ask them what questions they have or what they want to do. Don’t skip this step: the scenario will not work if you don’t have an initial message.
After that, type visitor’s reply options in Visitor’s reply bubbles. If you want to give your visitors more than two reply options, press +Add visitor’s reply. For example:
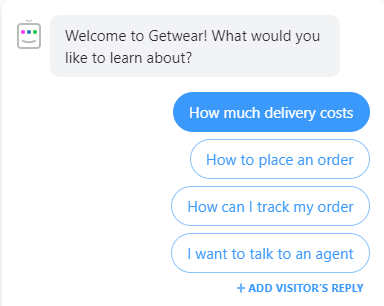
Continue the scenario depending on what option a visitor chooses. To do it, press on the reply options one by one and type a message that the bot will send to a visitor if they choose the corresponding option. After that message, you can offer a visitor new reply options.
For example, a visitor chooses the How much delivery costs option. You can continue the scenario in the following way:
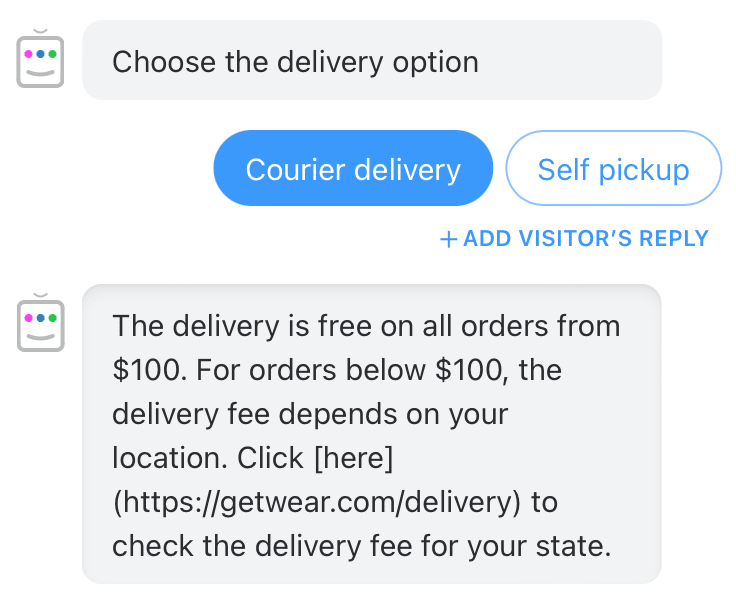
You can use the same message formatting as in regular chats: wrap hyperlinks, make the text bold or italics. You’ll see formatting hints when you start typing a message.
If you don’t add a visitor’s reply option after the bot message, the scenario ends. In this case, the bot can additionally send a finishing message which can be enabled in the settings below.
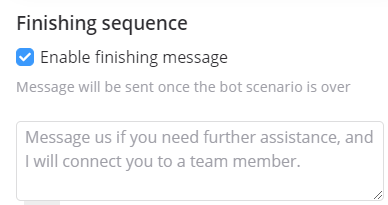
By default, the bot will send a message shown on the screenshot above, but you can type another message in this field. After the finishing message, a visitor will also see a button for restarting the scenario.
Continue the scenario for other reply options in the same way. Don’t forget to click on all visitor’s reply options to make sure you continued the scenario properly.
If you want to let visitors connect to a real agent, leave the bot message field blank:
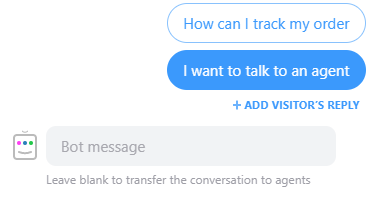
If a visitor chooses this option, its text will be sent to the chat, and your agents will receive a notification and will be able to help the visitor.
When you complete the scenario, press the Save button at the bottom of the screen.
To launch the scenario, go to the Targeted chats & triggers tab and create a new trigger. Add the required conditions, and choose the Start a chatbot scenario option at the bottom of the page. For example:
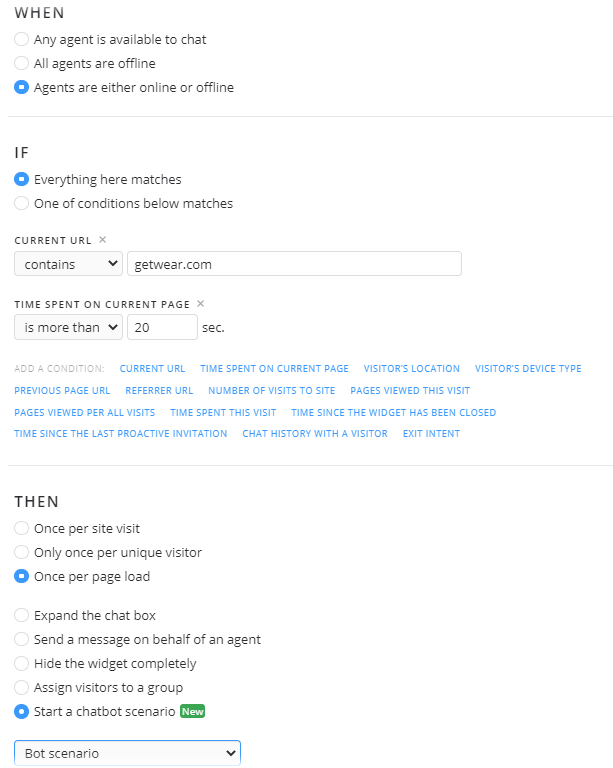
That’s it.
NB! If you want the scenario to start only after a visitor opens the chat window, add the Chatbox state condition to your trigger and set it to Opened.
Before launching the bot on the front page of your website, you can try to launch it on a different, unimportant page. To do it, enter the link to that page in the settings of the trigger that launches the bot. Test the scenario yourself, and if you are satisfied with the texts, edit the link in the settings of the trigger and save the changes. Enjoy not having to reply to the same basic questions and let the bot do the work for you!
If you still have any questions, let us know in the chat!
Contact form bot
Chatra Bot is designed to welcome visitors, collect their contact and other details. It sets the tone of the conversation in Chatra.
After the first message has been sent, the bot asks visitors to introduce themselves by displaying a series of questions like name and email which appear step by step:
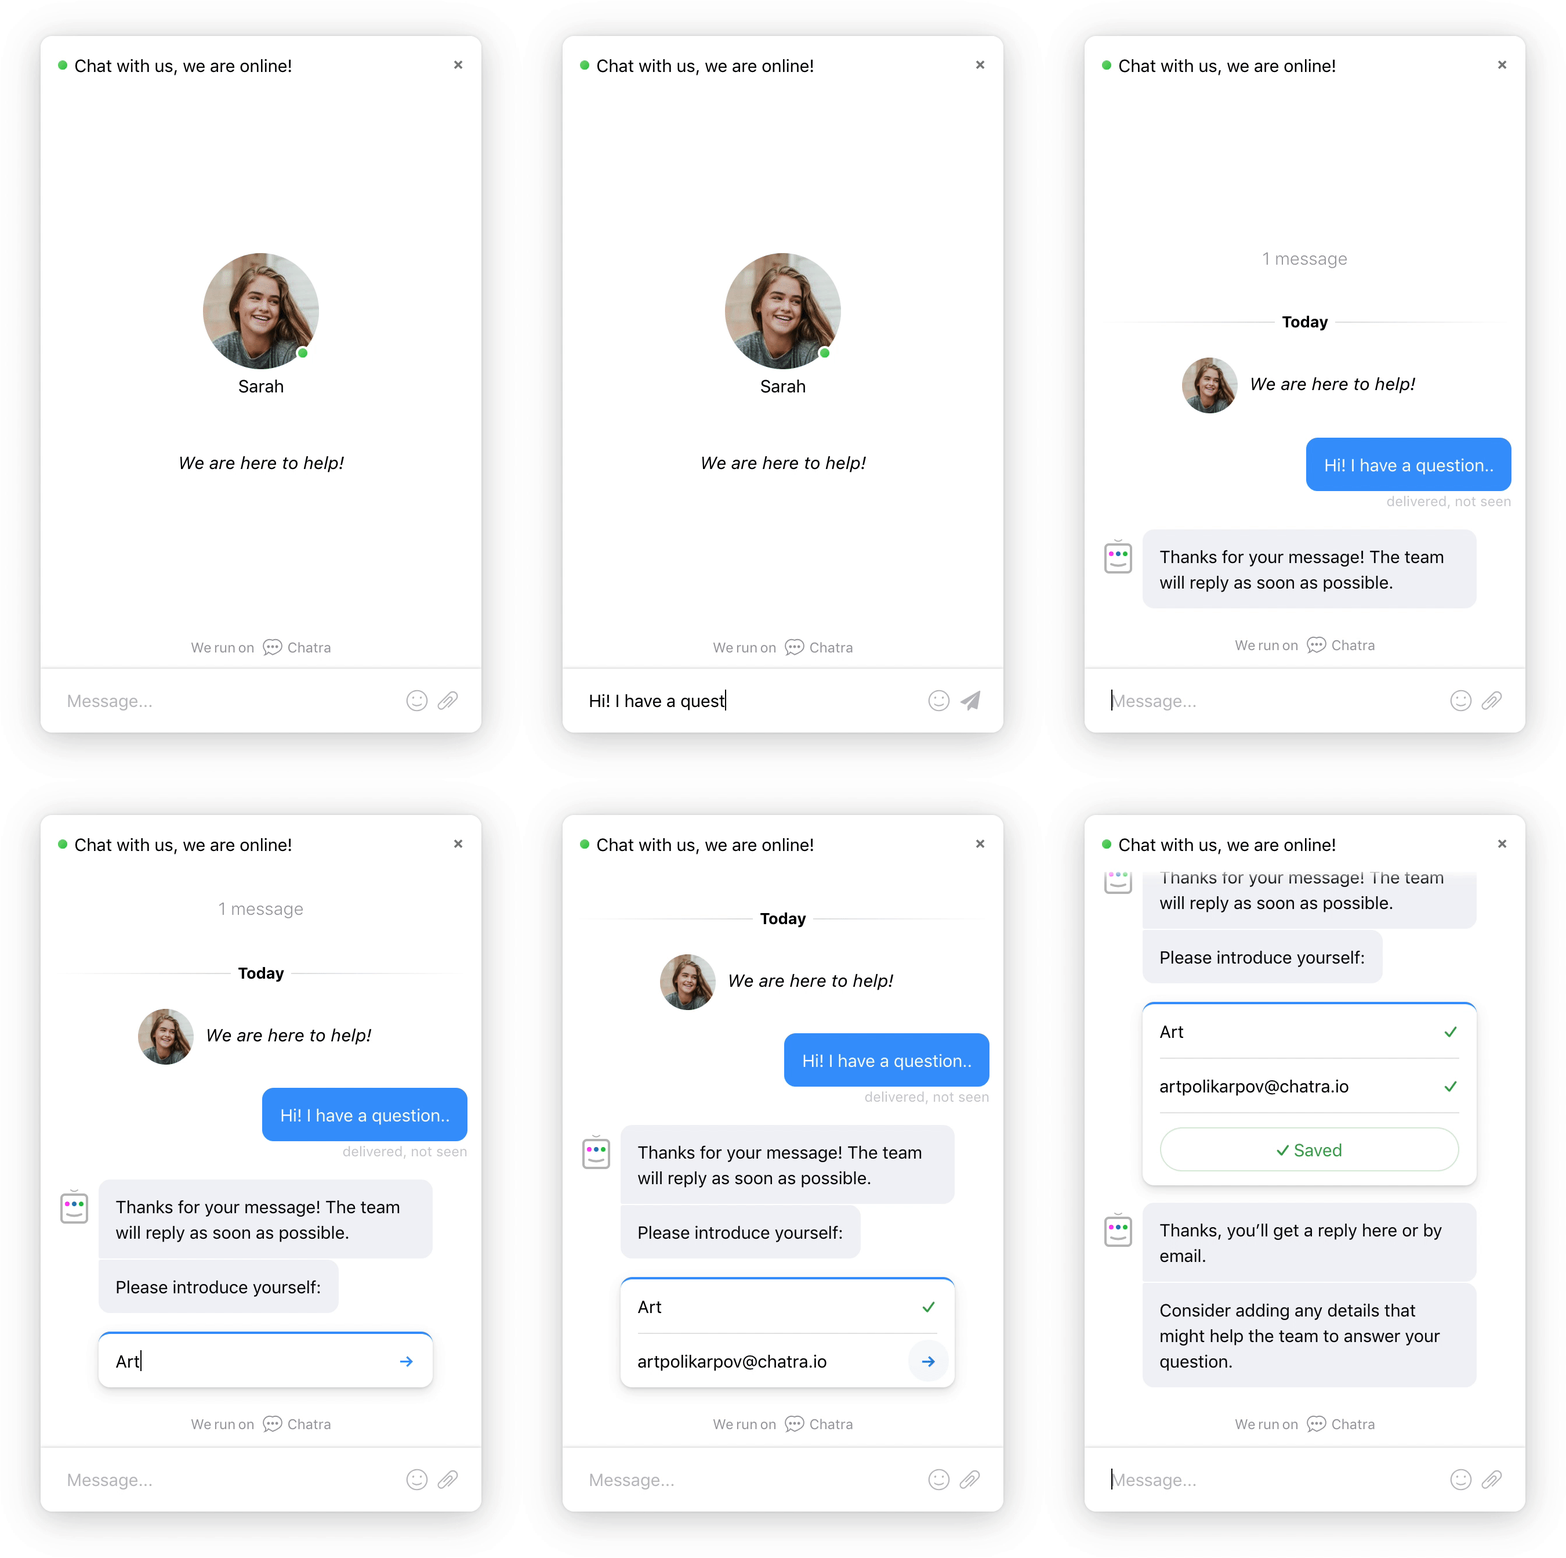
Visitors can fill out the fields in a consecutive order and hit enter or click the arrow button to proceed. After the form has been filled, the bot thanks your customers and lets them know you will reply soon.
Visitors can always get back to the form and change their details if necessary. The form will be resubmitted after that.
Agents will see when the visitor was asked to introduce themselves and how the form was filled:
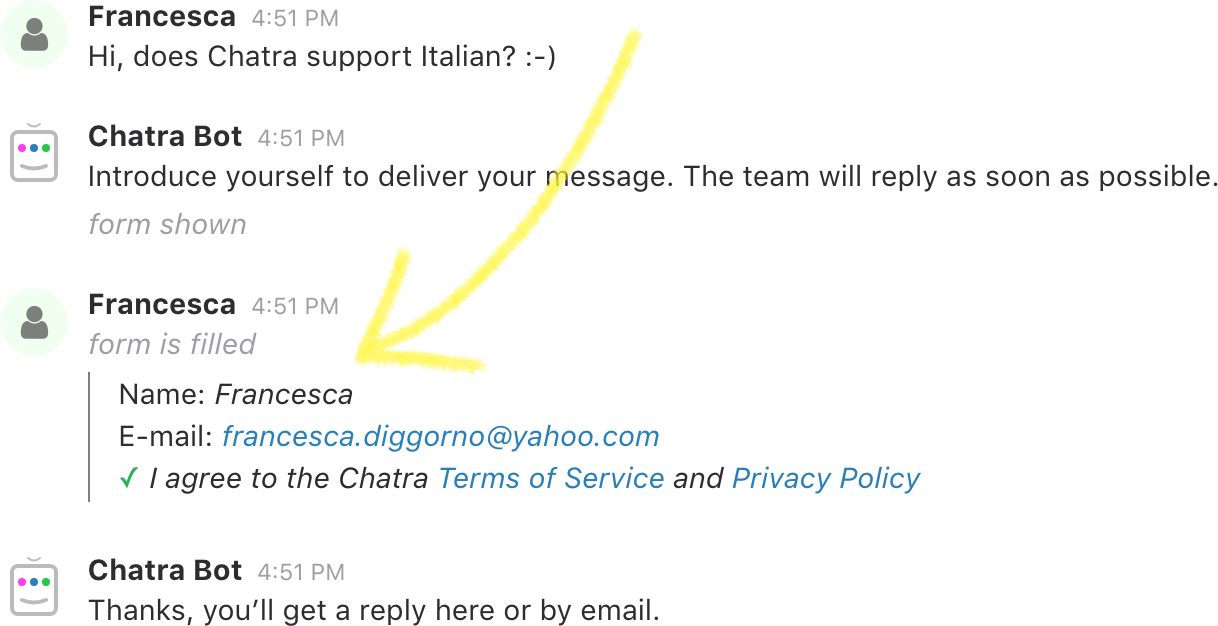
Chatra Bot does not interfere with targeted chats, as it appears only after a visitor sends a message.
Online and offline
To enable the online Chatra Bot, choose one of the options from the drop-down menu. You need to be an account owner or an administrator to access it:
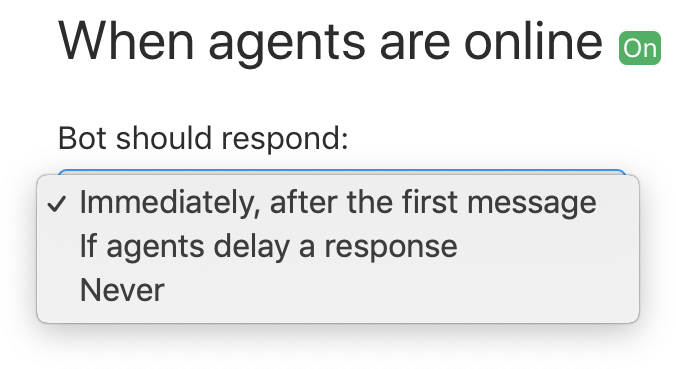
If you choose the “if agents delay a response” option, you will be able to specify the delay time after which the bot will start.
When offline, the bot is always on.
Form fields
You can adjust the fields of the bot here as well:
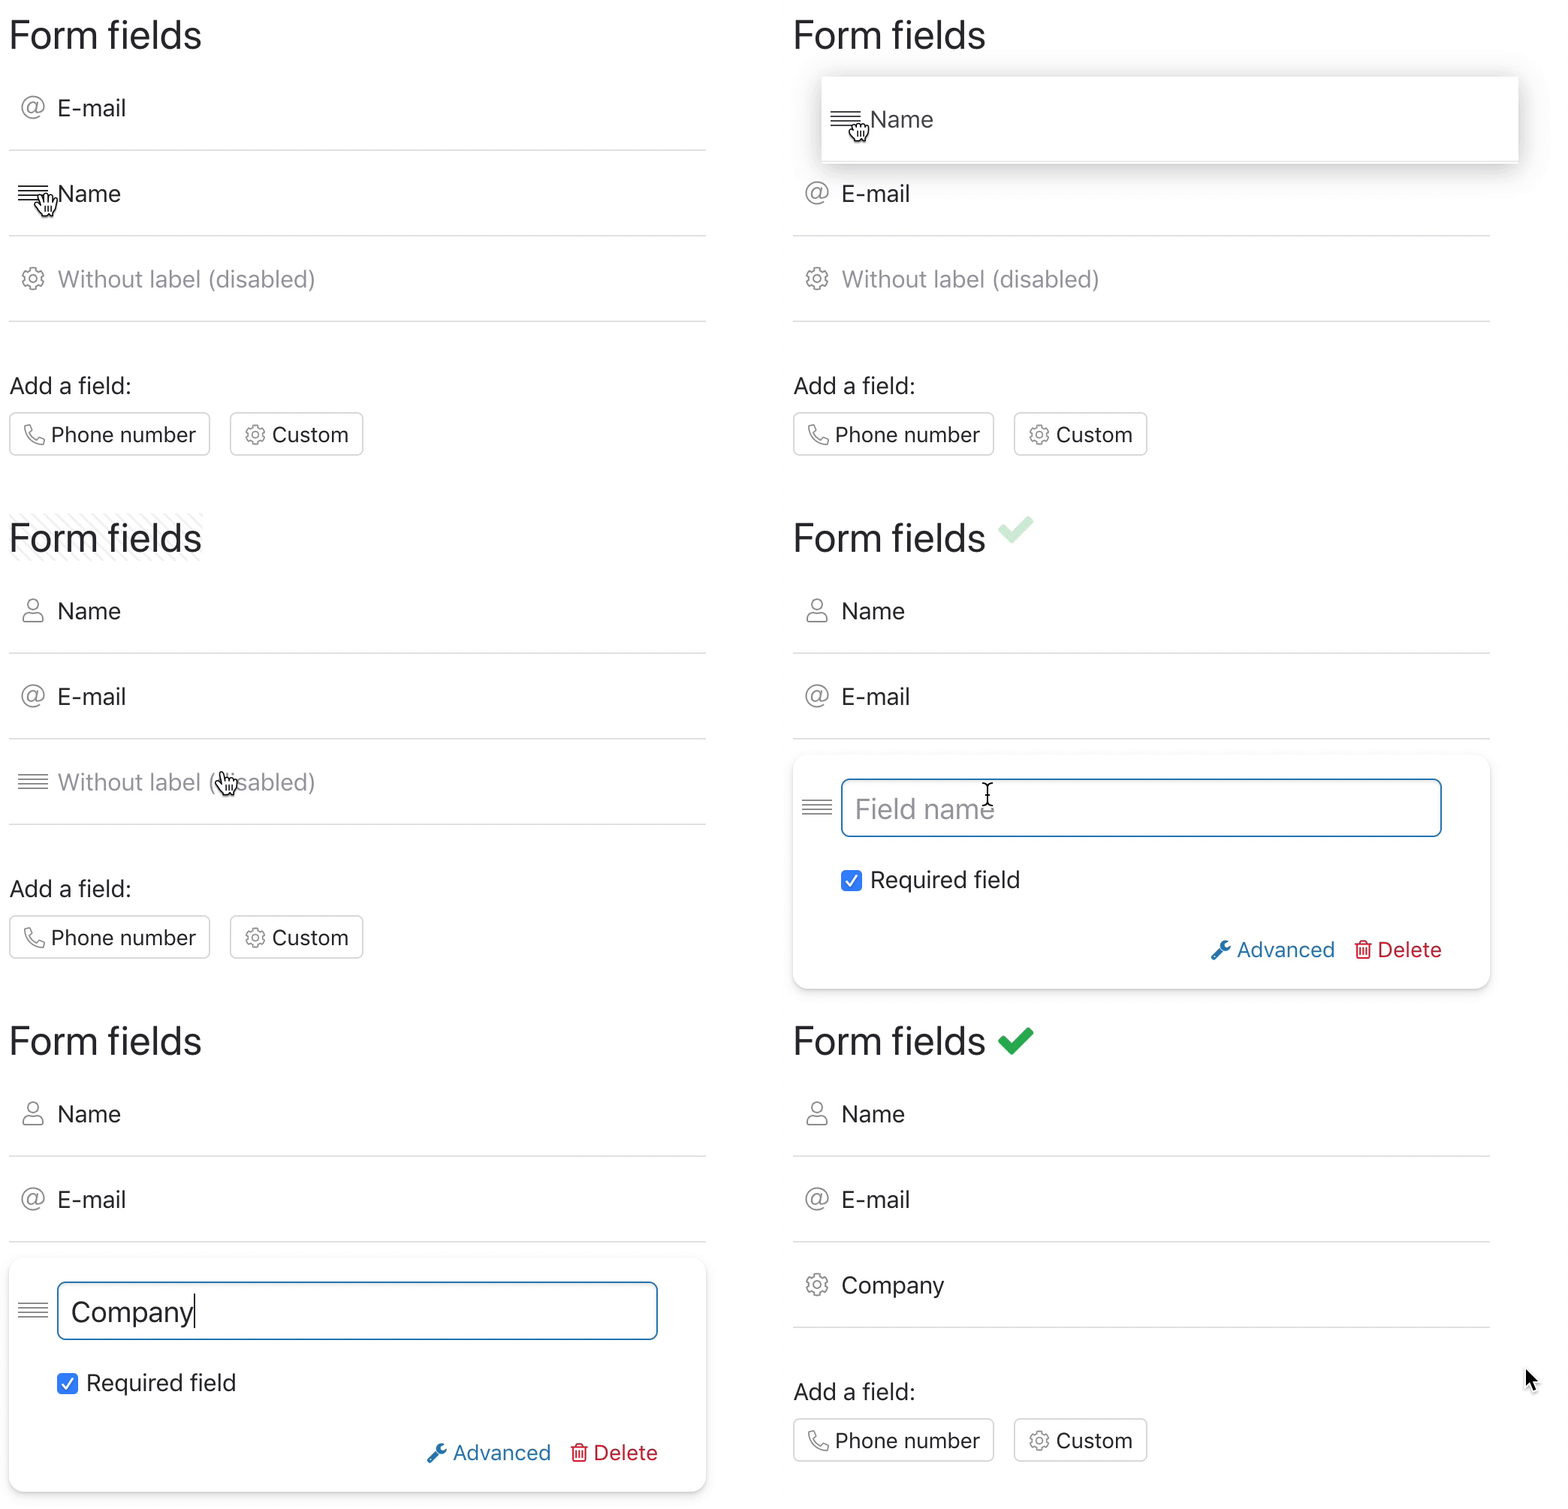
Checking the field as required will make it mandatory to fill out. However, the entire form is not compulsive to fill by default, so visitors may ignore the invitation and remain anonymous.
If you don’t like to chat with anonymous visitors, put a checkmark next to “Get messages only once the form is filled”, and/or “Get offline messages only once the form is filled”. In this case, the visitor will not be able to keep chatting until they fill out the form, and you will not receive any messages or notifications in your dashboard.
You can also add custom form fields to the Chatra Bot like company, or order number. You can use up to 5 fields and rearrange them by dragging and dropping in the right place. Whatever works for you!
Custom phrases
You can change the texts of the Chatra bot by clicking on Bot phrases at the bottom of the Chatra Bot settings page. Write your own custom texts in the appropriate fields, and clear the fields if you wish to restore defaults.

If your widget is multilingual, don’t forget to change the texts for all languages used. You can click on the little language icons like EN or ES to switch to a different language.
We recommend writing phrases in the third person to let your visitors know that it’s a bot and avoid possible confusion.
Become invisible
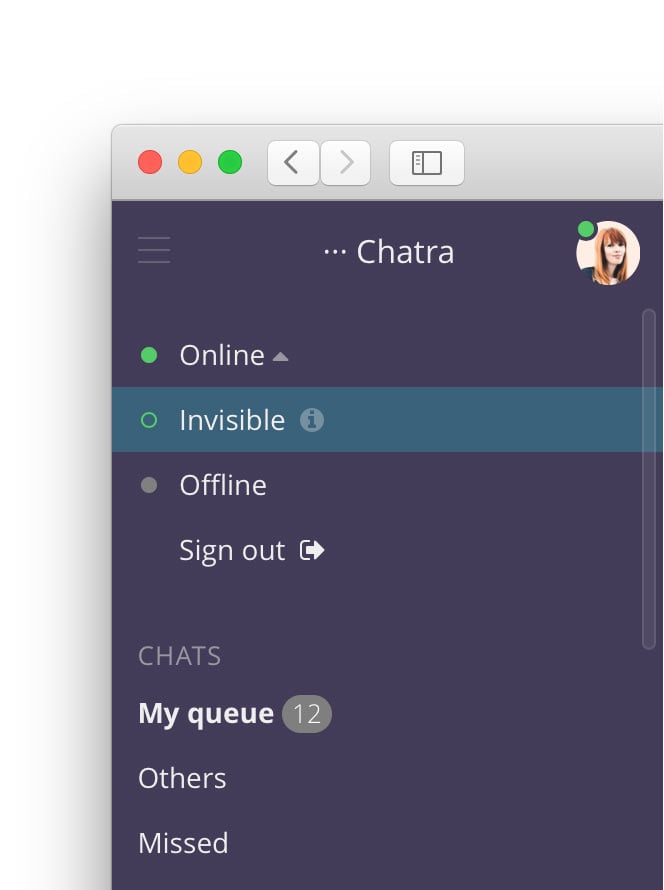
When invisible, you won’t receive new chats or send online pro-active (targeted) chats to visitors. Other agents can invite you to join a chat and you’ll receive a notification.
To join a chat by yourself, start typing something. You will become online there and stay online in the ongoing chats you have joined prior to going invisible.
Use the invisible mode to be accessible while focusing on other tasks, or switch it on at the end of the workday to complete the ongoing chats without receiving the new ones.
You can also use it when there are simply too many chats to handle them live – go invisible and if there are no other online agents Chatra will switch to an offline messenger mode. This will let your customers know it might take a little while to have their question answered without discouraging them from contacting you.
With invisible mode you can have all your team members (sales, engineers and even a CEO) in Chatra – they will only get notified once you add them to a conversation with a customer – and only when there’s a need for that.
NB! To get notified of new conversations when Chatra is in an offline messenger mode, check box “Receive new chat notifications when invisible if online agents delay in responding” in your account settings:

This also allows you to join conversations where a customer is waiting for a reply for too long.
Operating hours
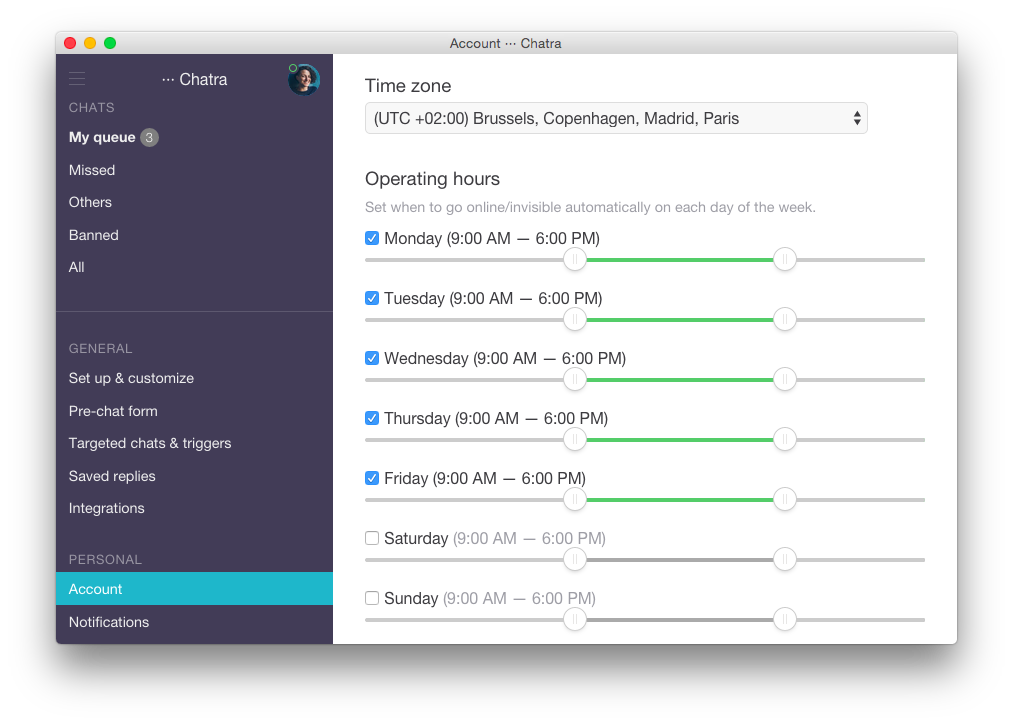
You can set your schedule in Chatra. We will notify you when your workday begins and ends and change your status automatically.
In the beginning of your workday we send a notification and set you online, in the end you will become invisible.
The minimum length of the working day is 1 hour, the maximum length is 23 hours.
You'll receive the notification both on your desktop (if you have the app running) and on your phone (if you have the app installed). If you have a mobile app, you'll be set online automatically.
If you use Chatra on desktop only and the app is not running, we won't be able to notify you and you will be set online only once you launch the app.
Groups
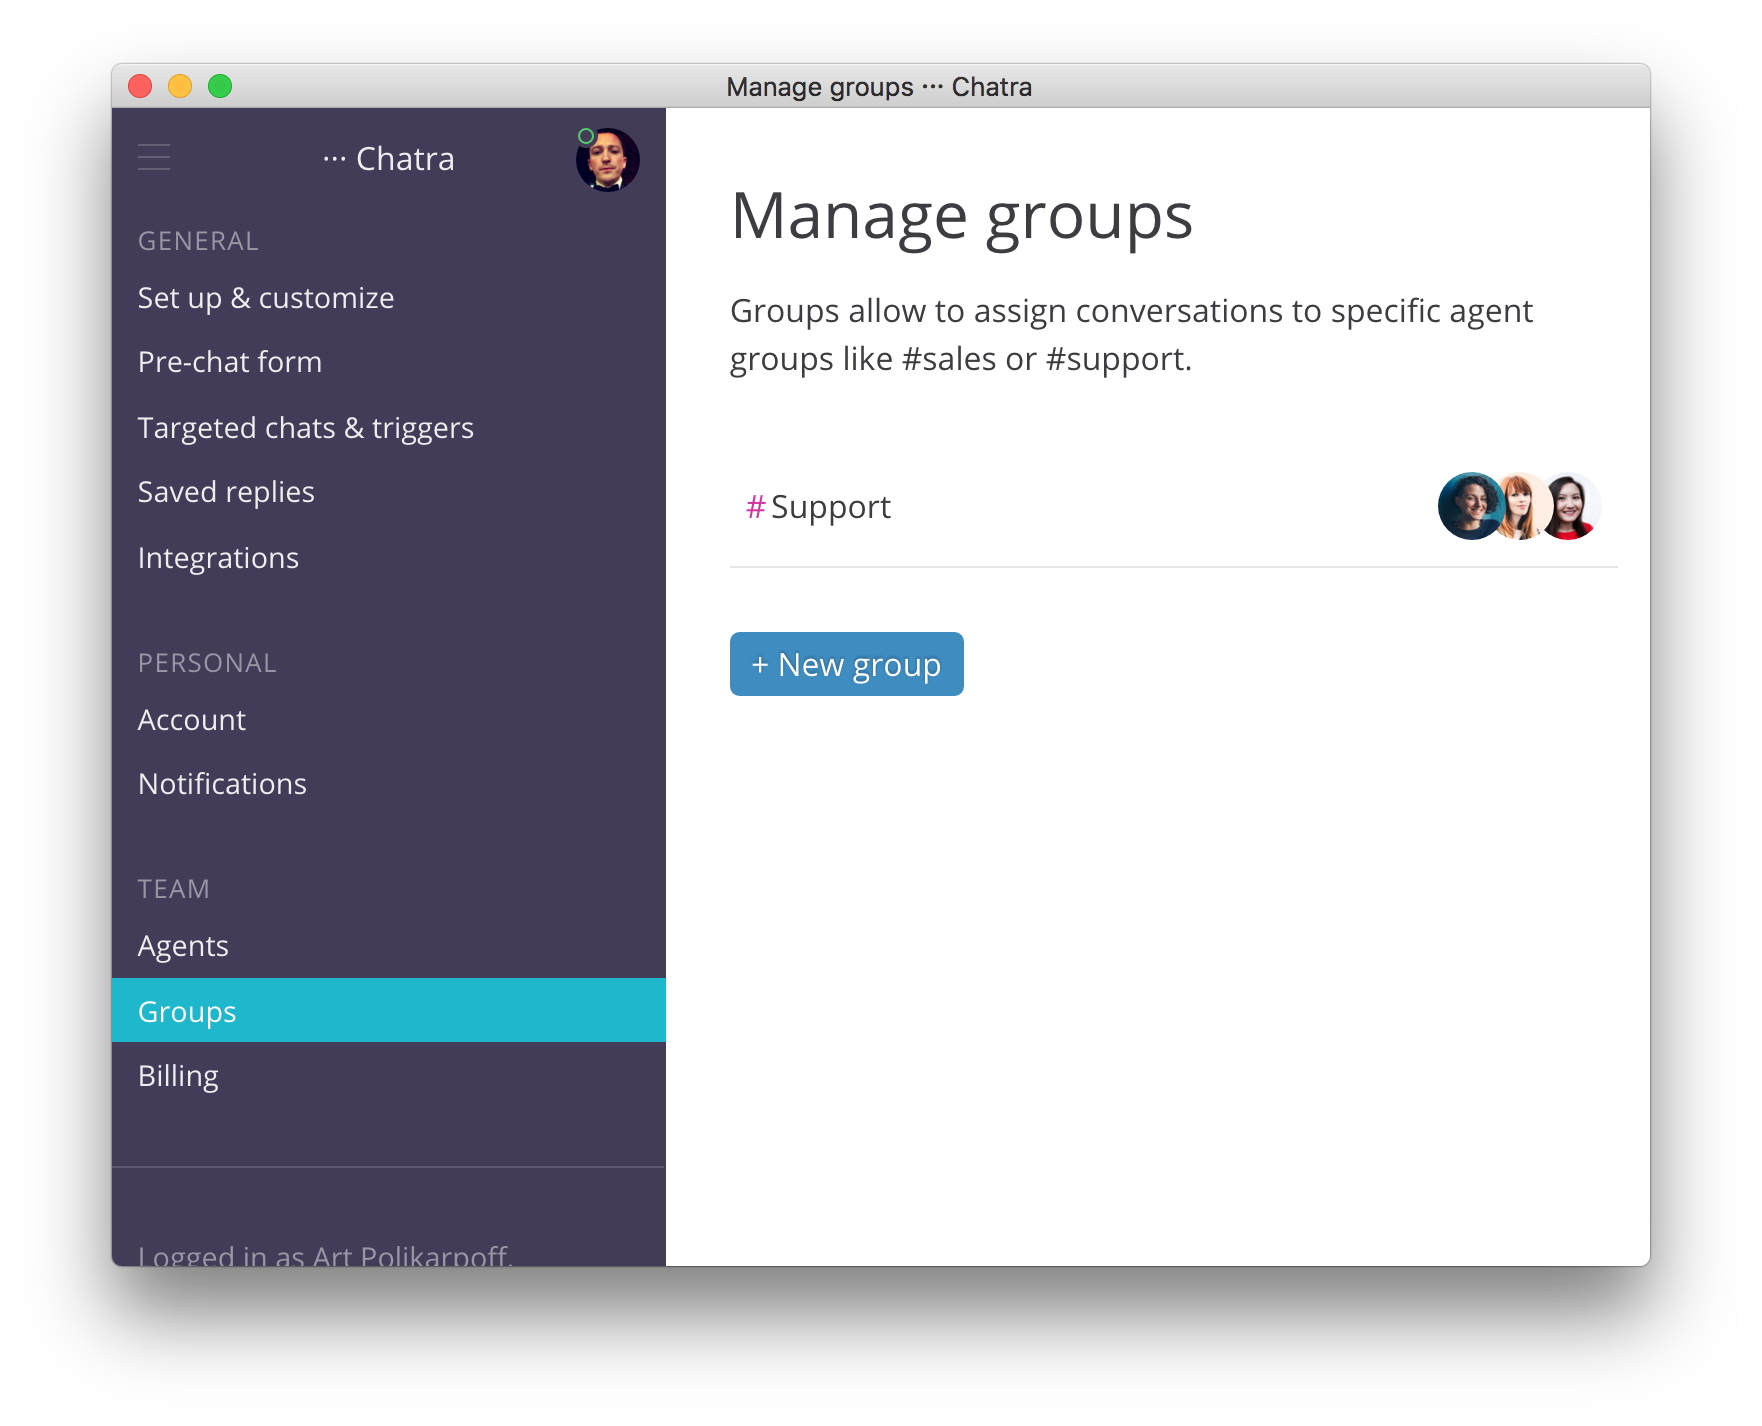
Groups is a paid feature that allows you to assign chats from visitors to certain groups of agents. For example, you can route the chat to “sales” or “support” basing on the page where the chat was started. Or, if you have several websites, you can create separate groups with different agents for each website.
Creating and editing groups
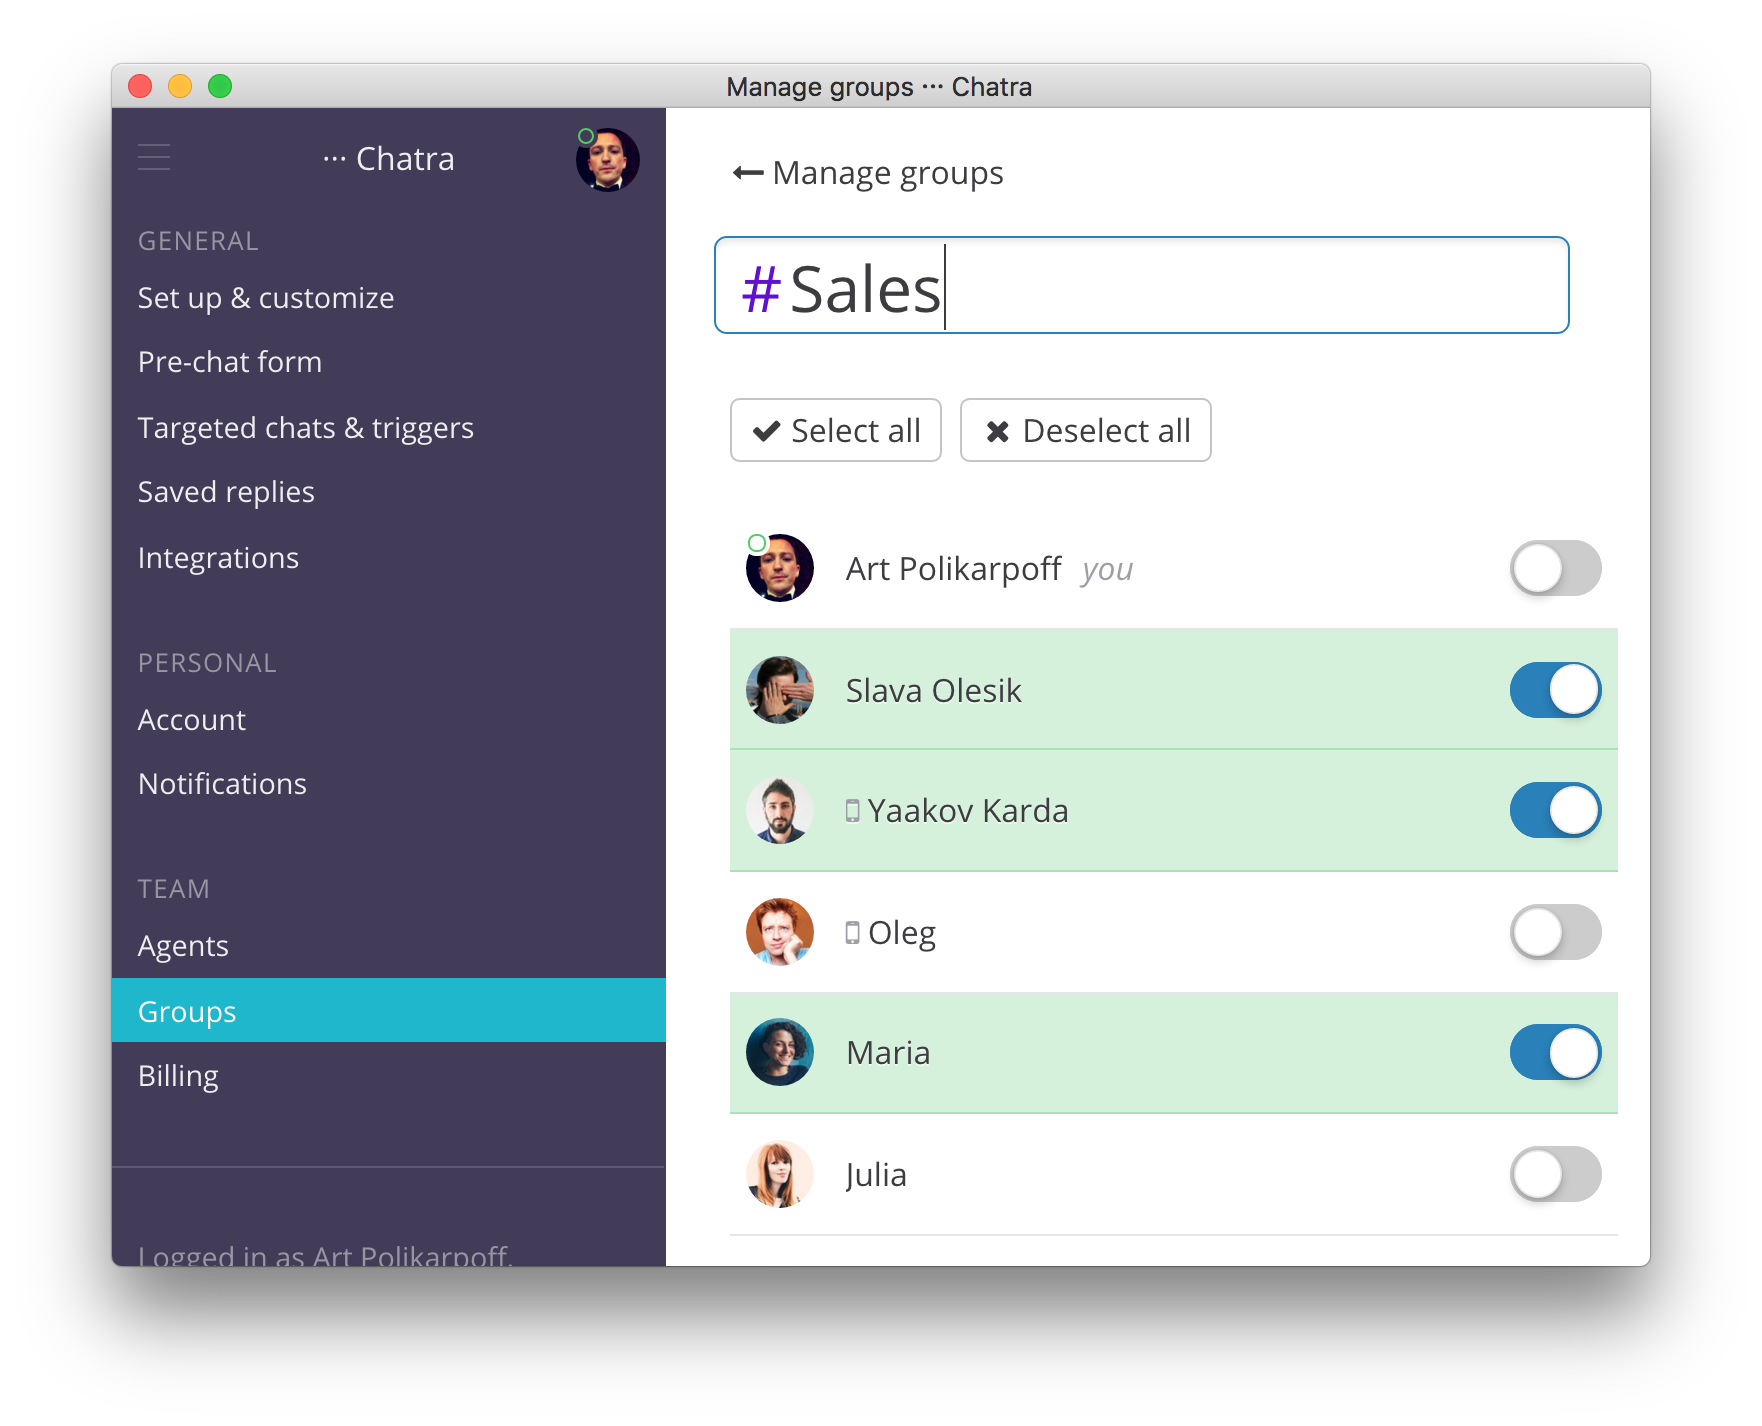
Create and edit groups in the “Manage groups” section:
All you need to do is come up with a name and choose agents:
Assigning visitors to groups
There are four ways to assign a chat to a certain group:
- by adding a line of code before the Chatra widget code;
- with automatic triggers;
- manually during the conversation;
- by asking your visitors to select a group.
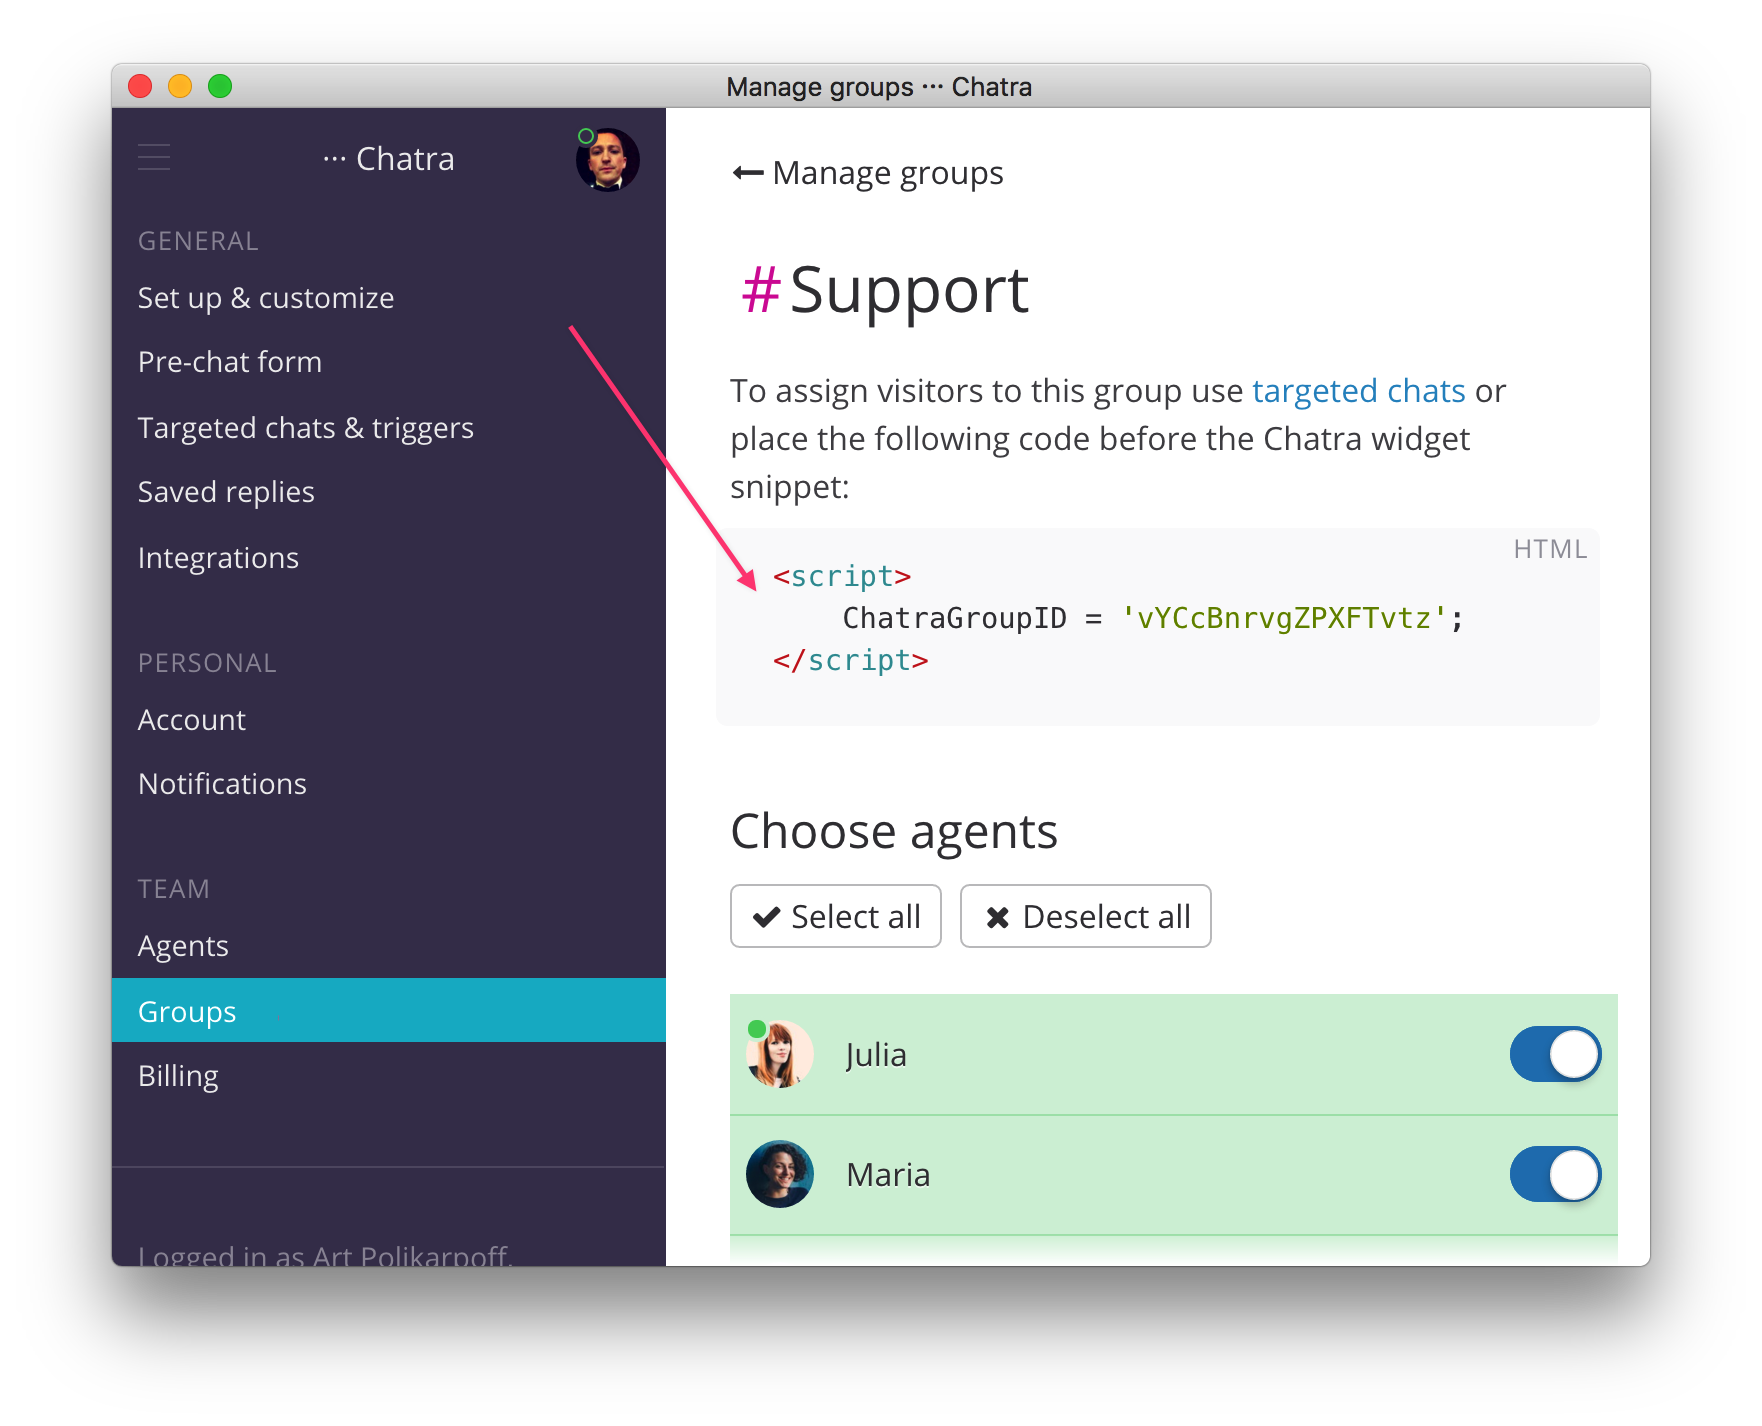
The code with ChatraGroupID for adding to the page of your website can be found on group editing page in the dashboard:
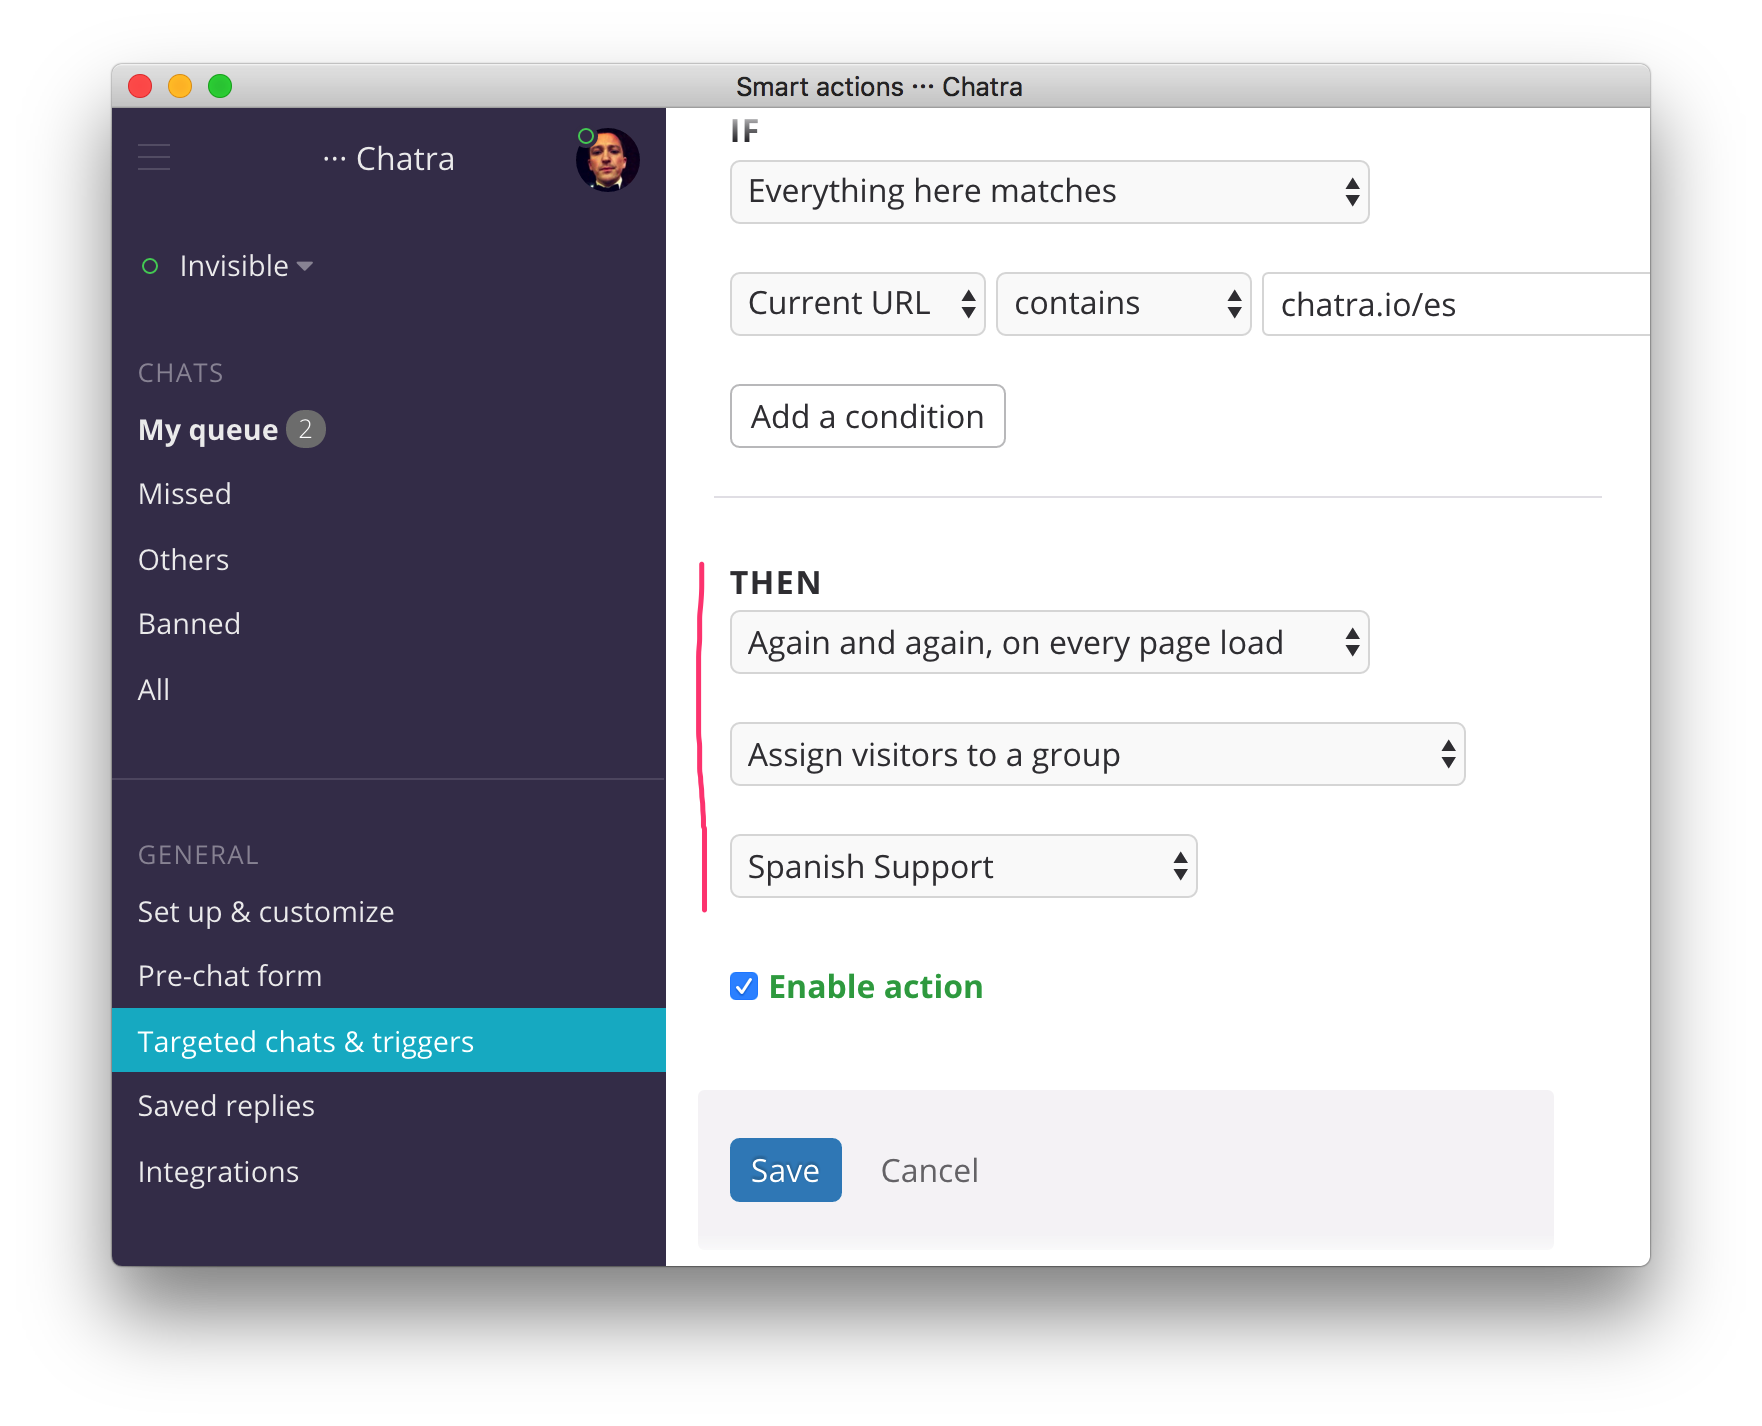
If you cannot edit the code or want to select the group by more complicated criteria, use automatic triggers. Add conditions, as usual, and in “Then” section choose “Again and again, on every page load” in the first drop-down menu, “Assign visitors to a group” in the second, and then select the required group in the third.
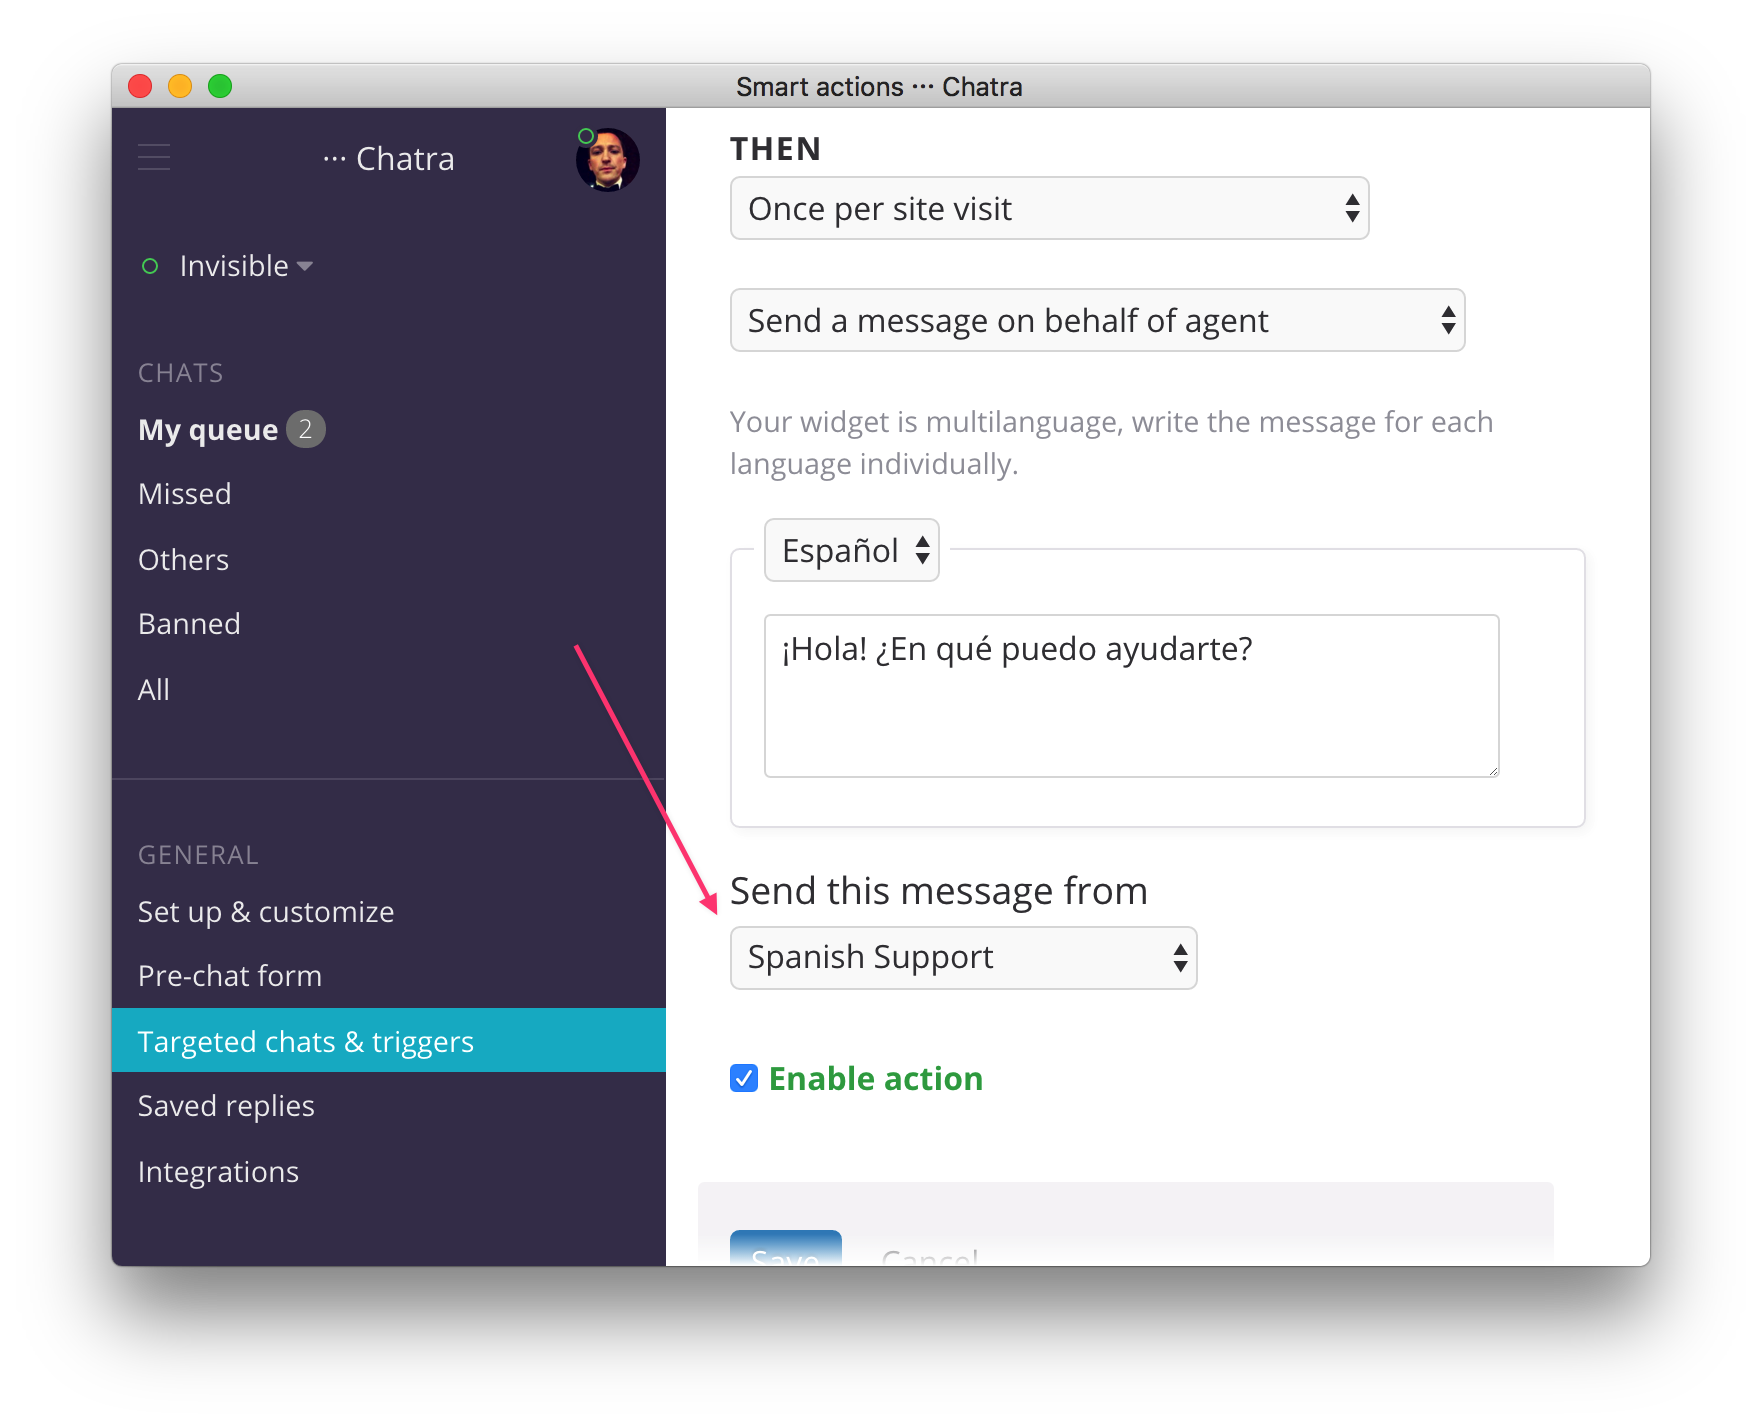
You can send proactive chat invitations from a certain group:
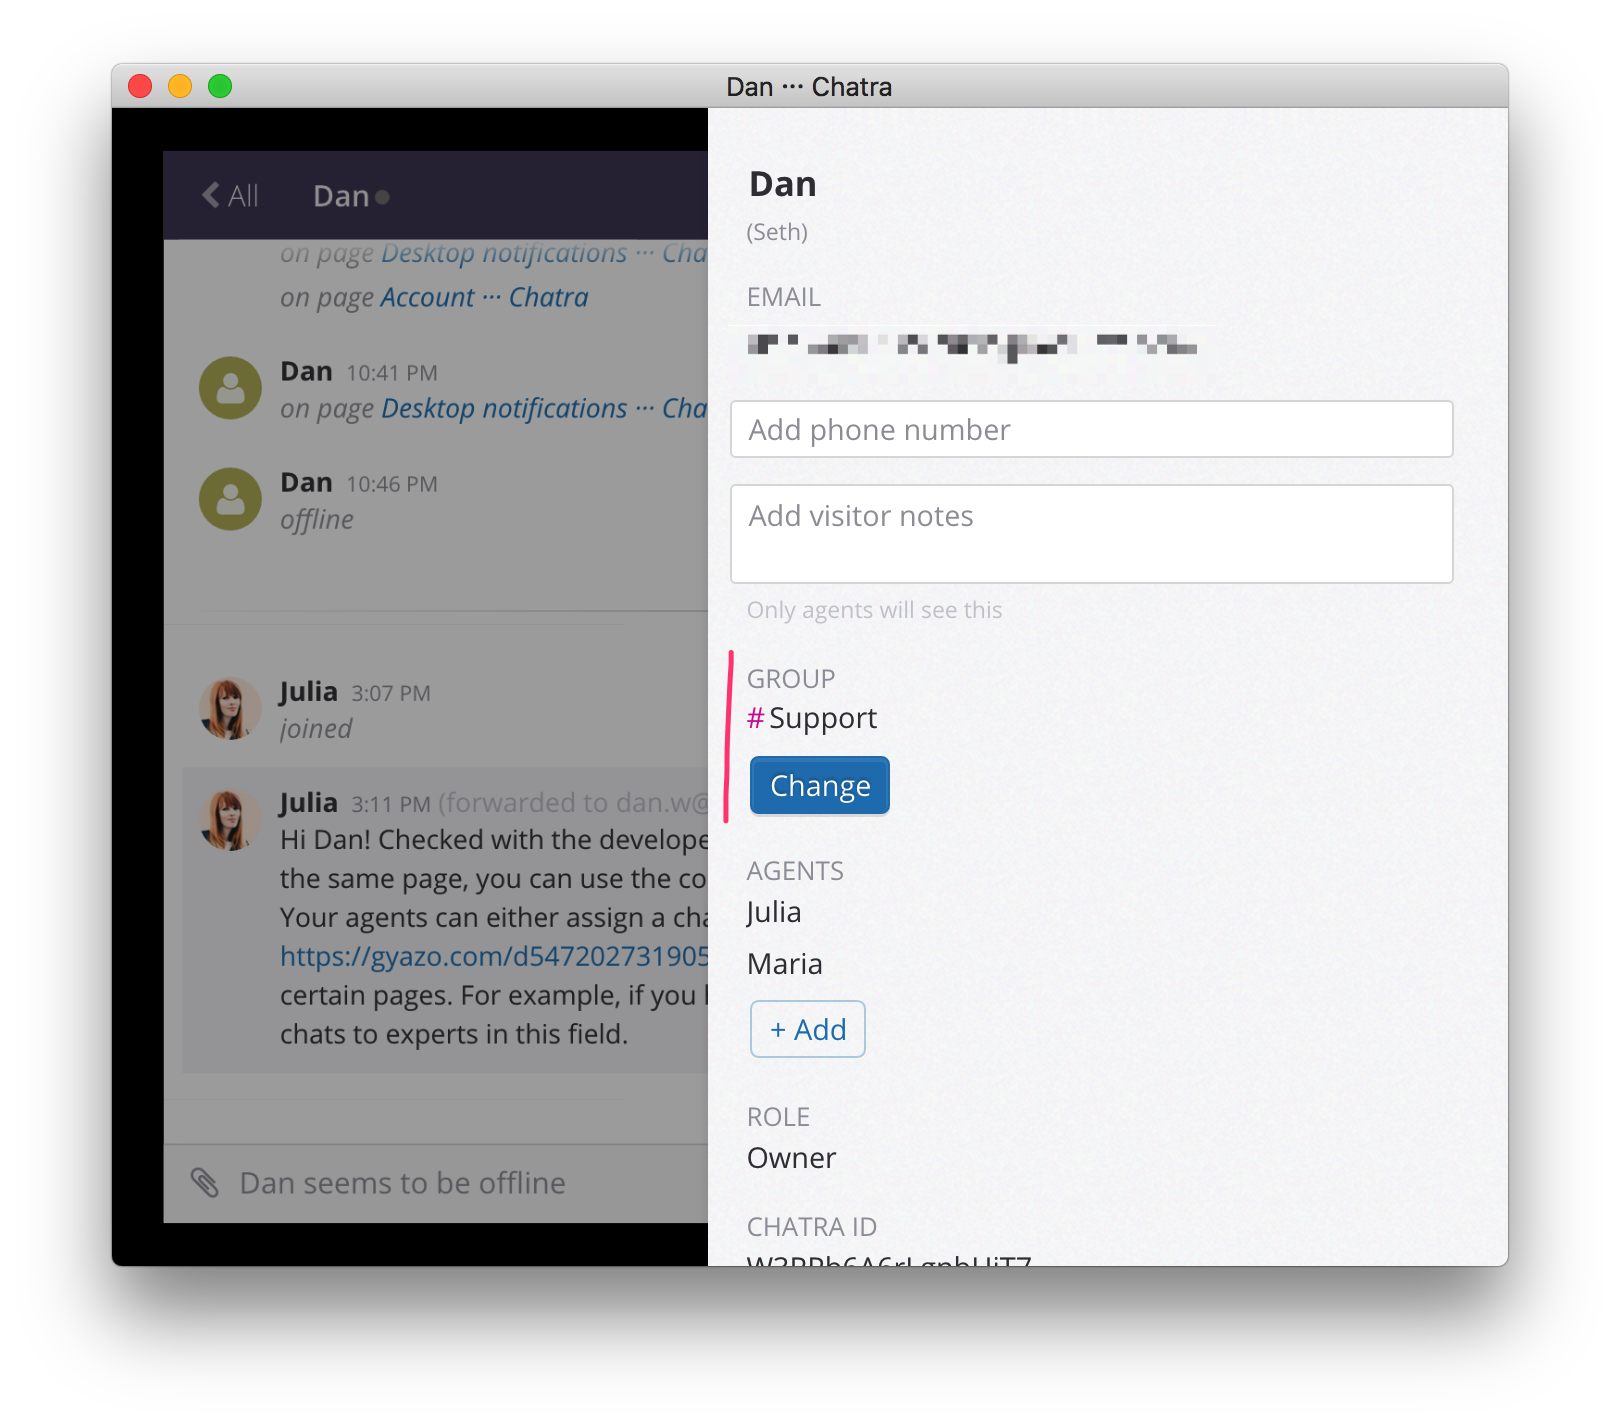
Also you can select and deselect a group in the panel on the right, agents of the selected group will be notified immediately:
To ask visitors to select a group when they send their initial message, enable the “Ask visitors to select a group” option on the Groups page:
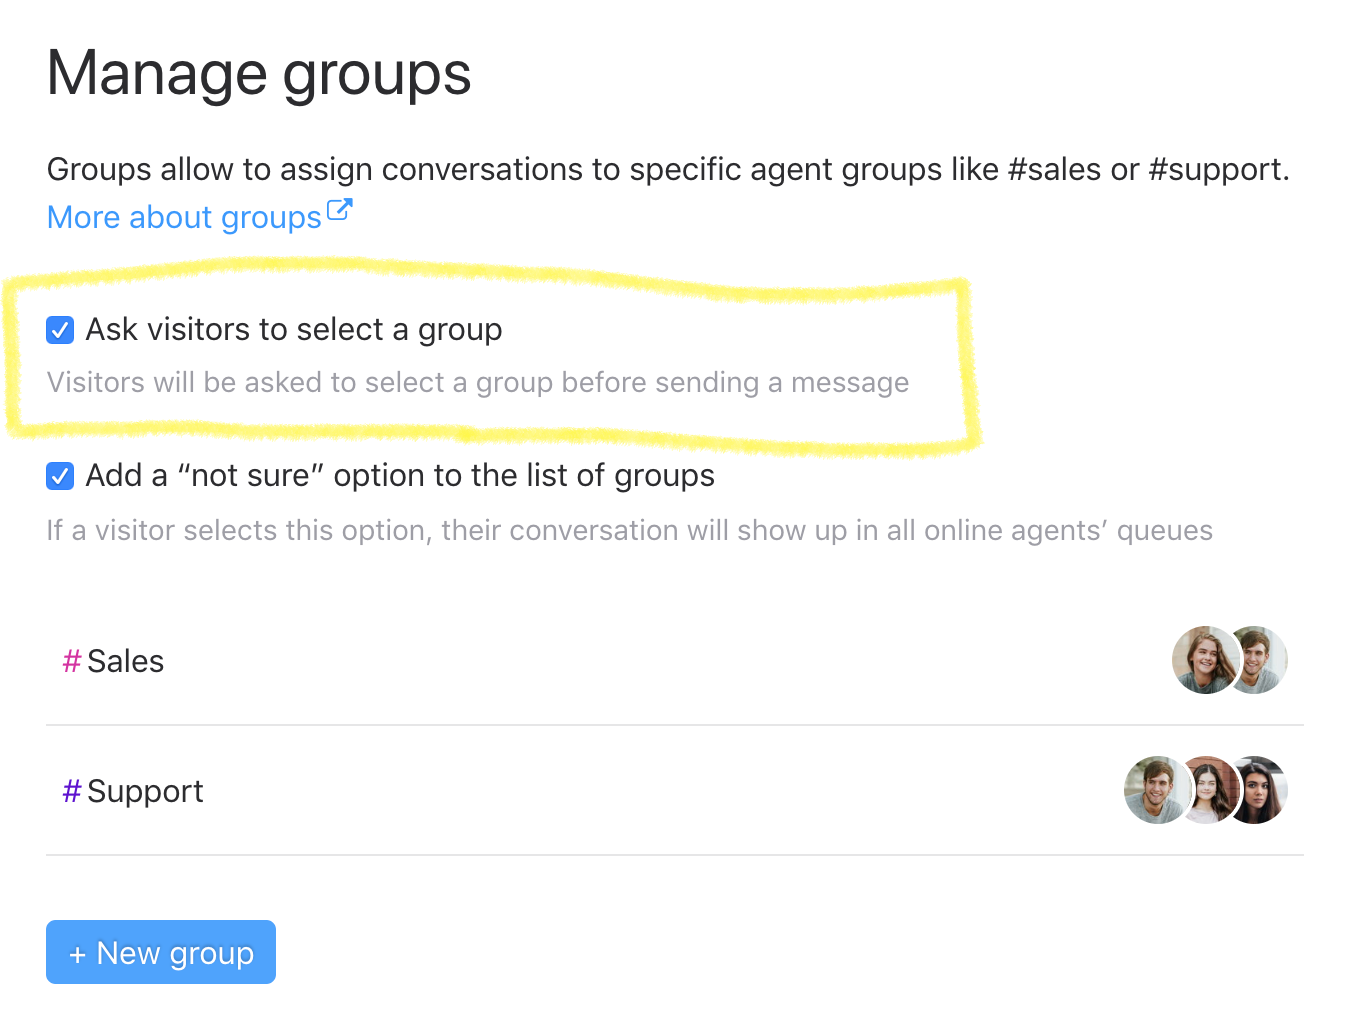
You can also add a “not sure” option to a list of groups by enabling the corresponding option. If a visitor selects this option, the conversation will be assigned to all agents online.
Please note, visitors will not be able to choose a group, if:
- You have fewer than 2 public (non-private) groups.
- The visitor has already been assigned to a group by a targeted chat or via our API.
- A visitor is replying to a targeted chat sent on behalf of an agent.
Mobile apps
We recommend using our web dashboard app.chatra.io in a browser, but you can use our desktop or mobile apps as well. Apps are available in both free and paid plans.
Satisfaction reports
See how well your team is performing in our Reports tab.
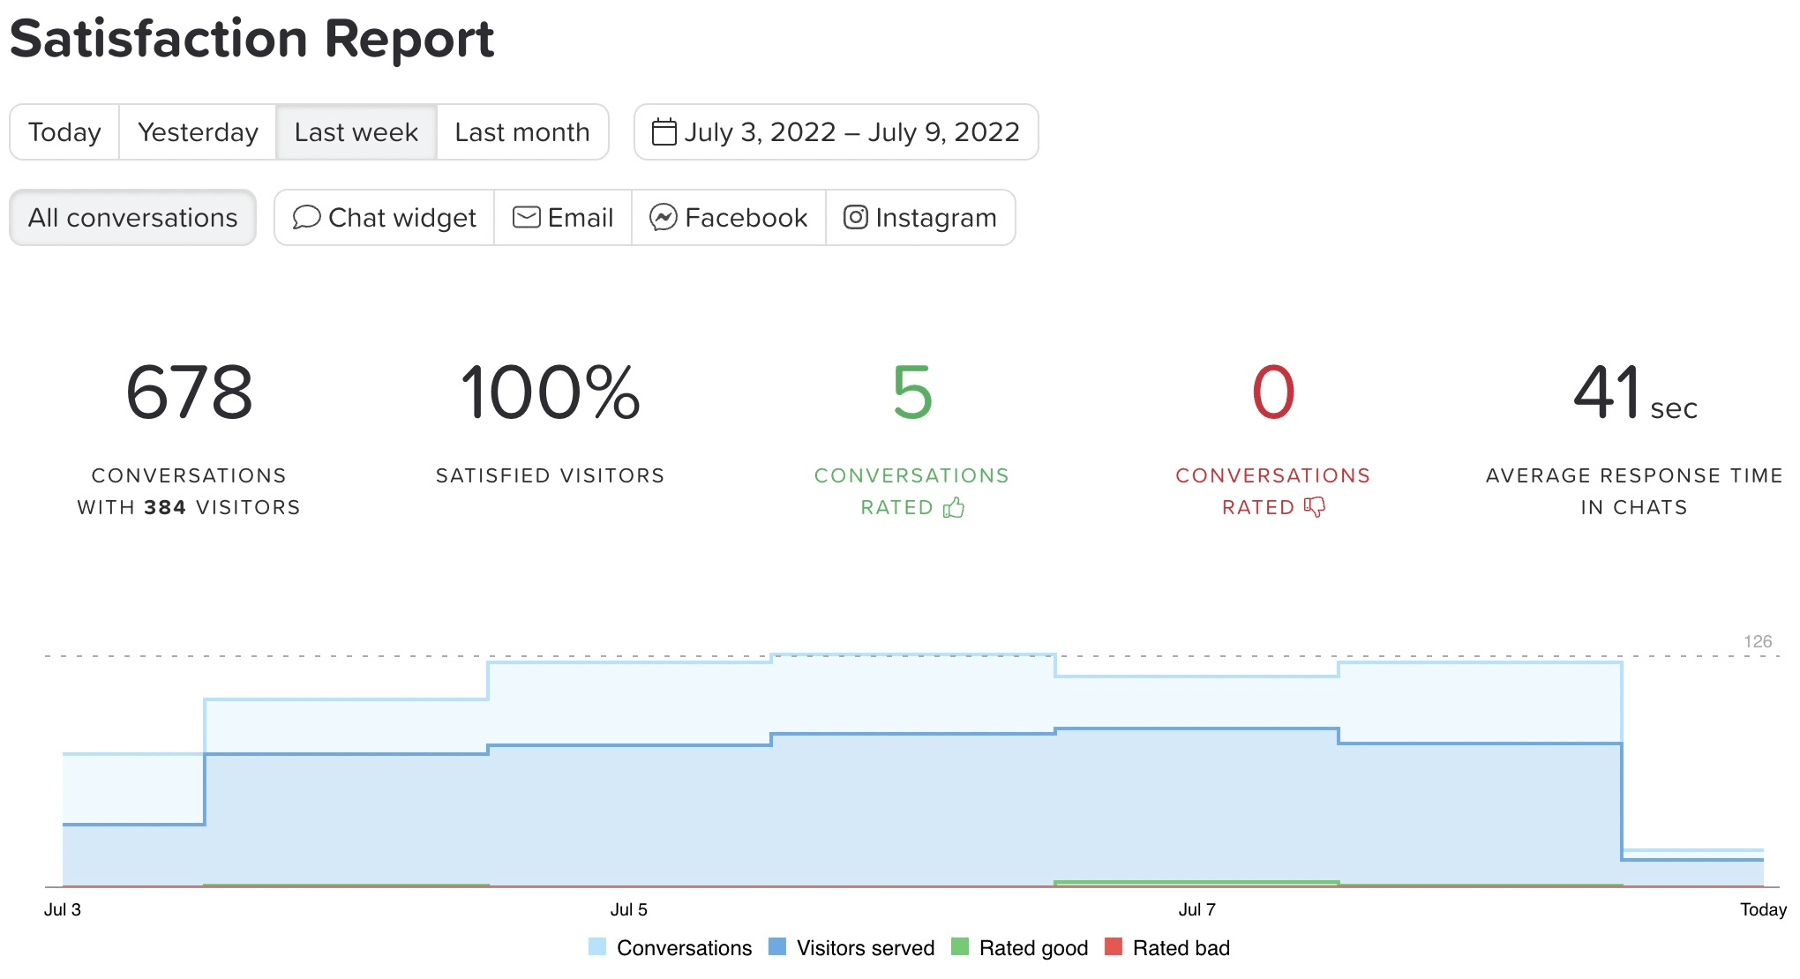
Here, you can see:
- The total number of conversations and visitors who chatted with you. The conversation is marked as completed and counted in the reports in 5 minutes if a visitor left your website or nobody replied to a new conversation, in 30 minutes of inactivity if a visitor is online, or immediately after all agents leave the conversation. When the same visitor sends another message after that, it counts as a new conversation.
- Chat ratings and visitor satisfaction. See how your visitors rate conversations and how satisfied they are with your agents.
- The average response time. See how quickly your agents assist visitors. The response time is calculated between the first message or a visitor and the first reply of an agent.
You can also check the performance of separate agents and groups or see the statistics for different connected channels if you click on them.
We add all the filters to the app link, so if you created a custom report and want to share it with another team member that uses Chatra, simply copy the link from the address bar. Your team member will see the same report if they use your link.

You can also download reports into a CSV file.
Note that Chatra is also integrated with Google Analytics, so you can track additional events there.
Emails export
If you wish to download emails of your customers to use in your marketing efforts, navigate to the
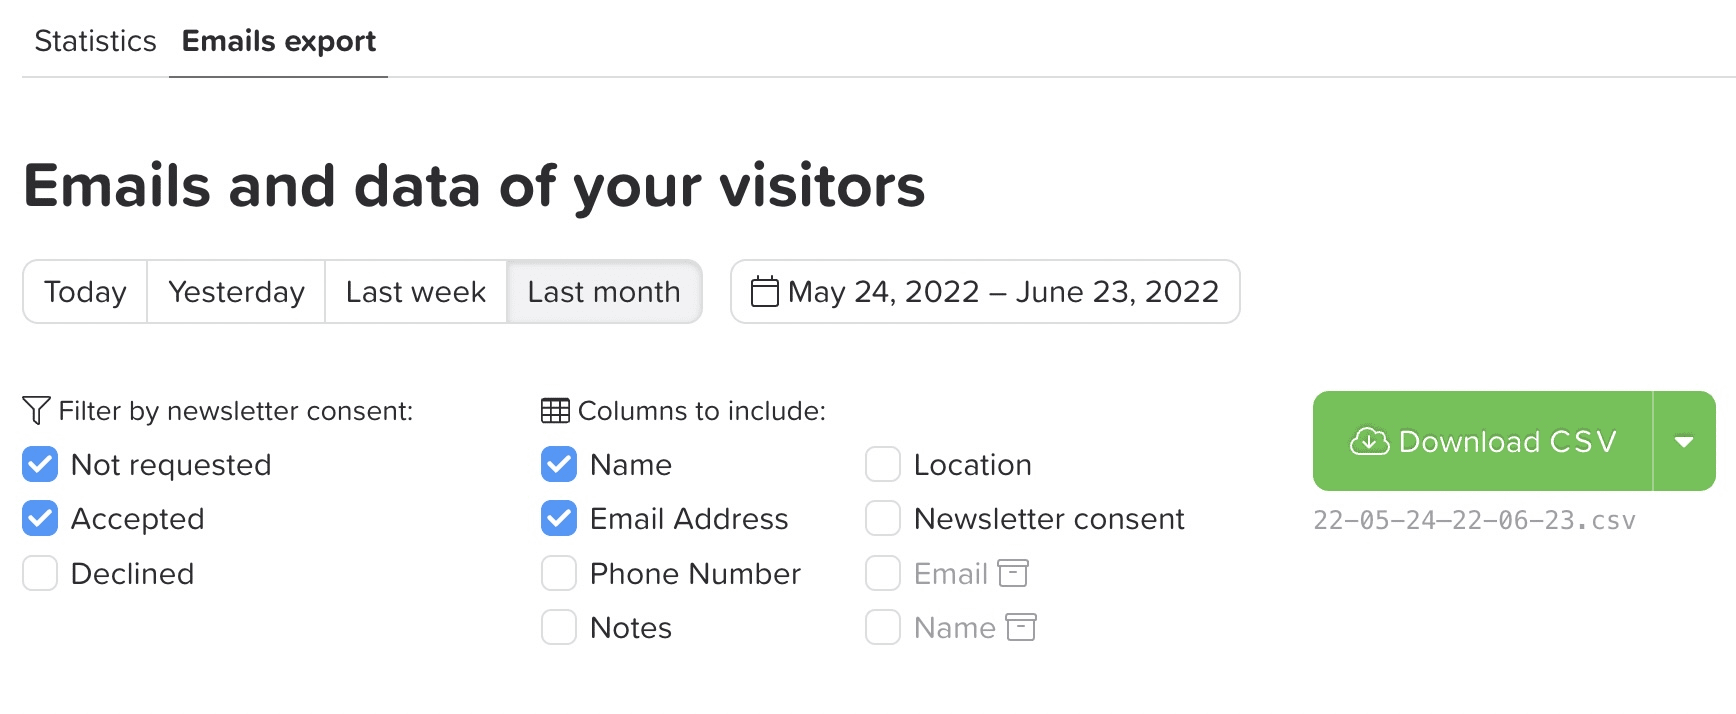
You can choose the date range and fields that you want to export. You can also choose to export only those visitors who agreed to receive your marketing emails (if this option is enabled in your contact form settings).
Other unique features
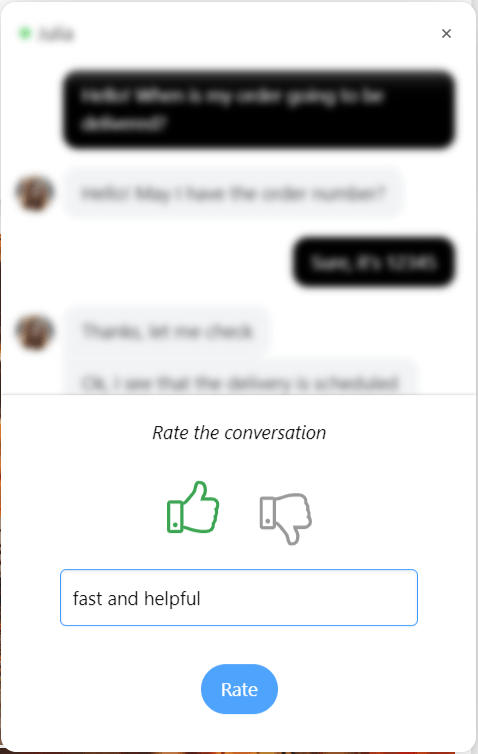
Allow visitors to rate conversations
This option is enabled by default and allows your visitors to rate conversations with 👍 or 👎 and leave a comment. The rating icon appears after an agent joins the conversation and sends at least one message.

Forward messages to email
Chatra can forward chat transcripts and offline or missed messages to your inbox – you can reply to your customers from there. We also have an integration with Slack and HelpScout.
NB! To send a message to a customer both via Chatra widget and email, reply from Chatra. If you use email or helpdesk to reply, the conversation in the Chatra widget won’t be updated.
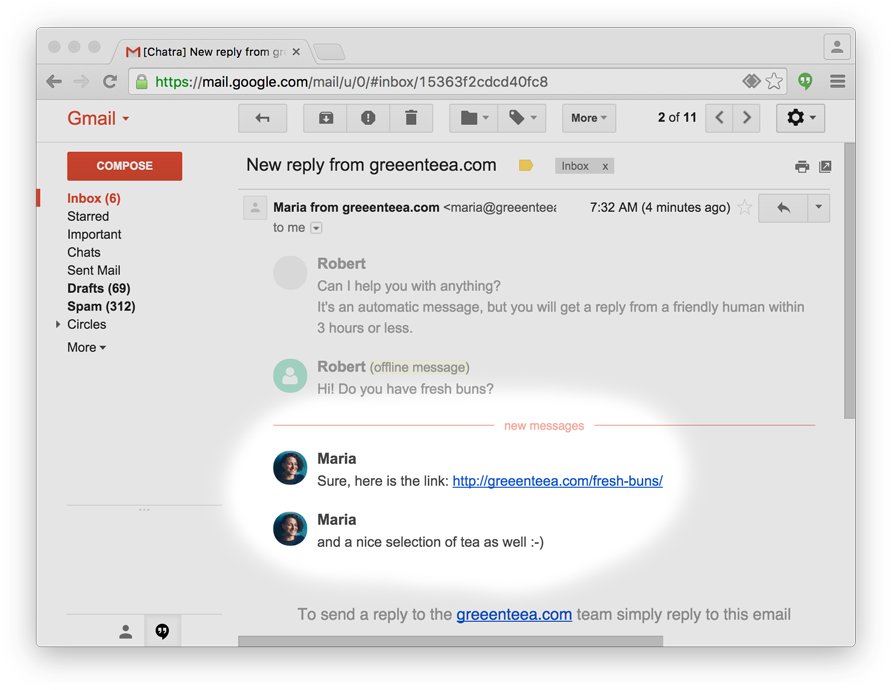
Reply from Chatra to offline visitors
You can reply from the app, even to customers who have already left your website:
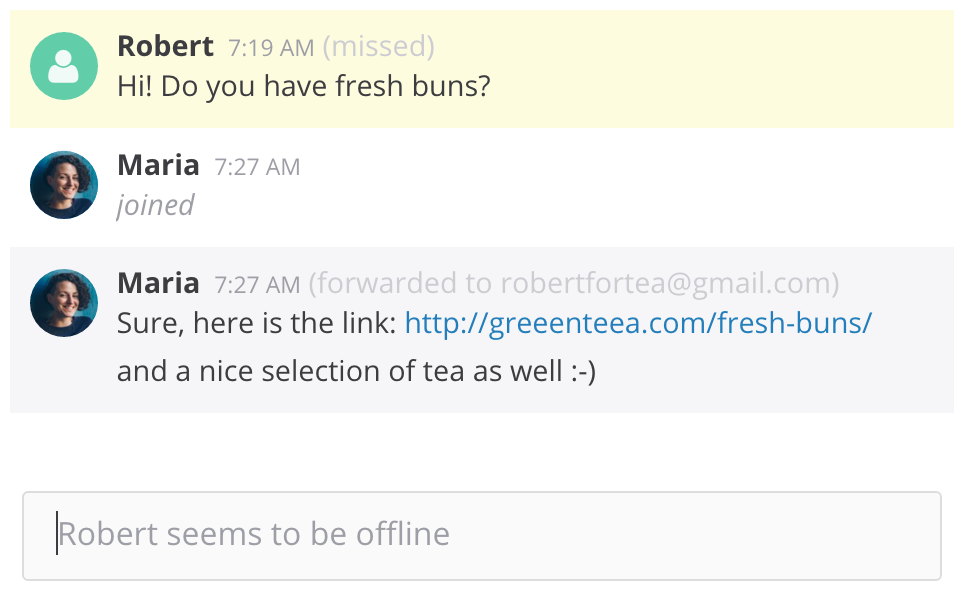
Visitors will see new messages if they come back to your website or will receive your reply to their inbox if they leave their email address:
Reply faster with saved replies
You can save replies to frequently asked questions and use them in future conversations. Just hit / in the message field and enter a keyword or keyphrase to find the reply you need:

To add templates, go to the Saved replies tab.
Intelligent chat queue
New chats appear in the queue section for all online agents. When an agent answers, they take ownership of the chat and it’s removed from the queue. If for some reason they don’t answer quickly enough, the conversation is returned to the queue automatically. This can drastically improve response time and efficiency.
Get rid of inactive chats in the queue by hitting ×.
Two’s company, three’s... even better!
Visitor need an answer you don’t have or wants to speak with someone else on your team? Add the required agent to a group chat and continue the conversation together. Wow customers with your personal service by enlisting multiple agents to take care of them. We’ve tried it, and they love it.
Want to pass the chat to someone particular based on location or some other factor without joining the chat yourself? Add the agent and, unless you start typing, the customer will never know you were there.
Detailed customer information
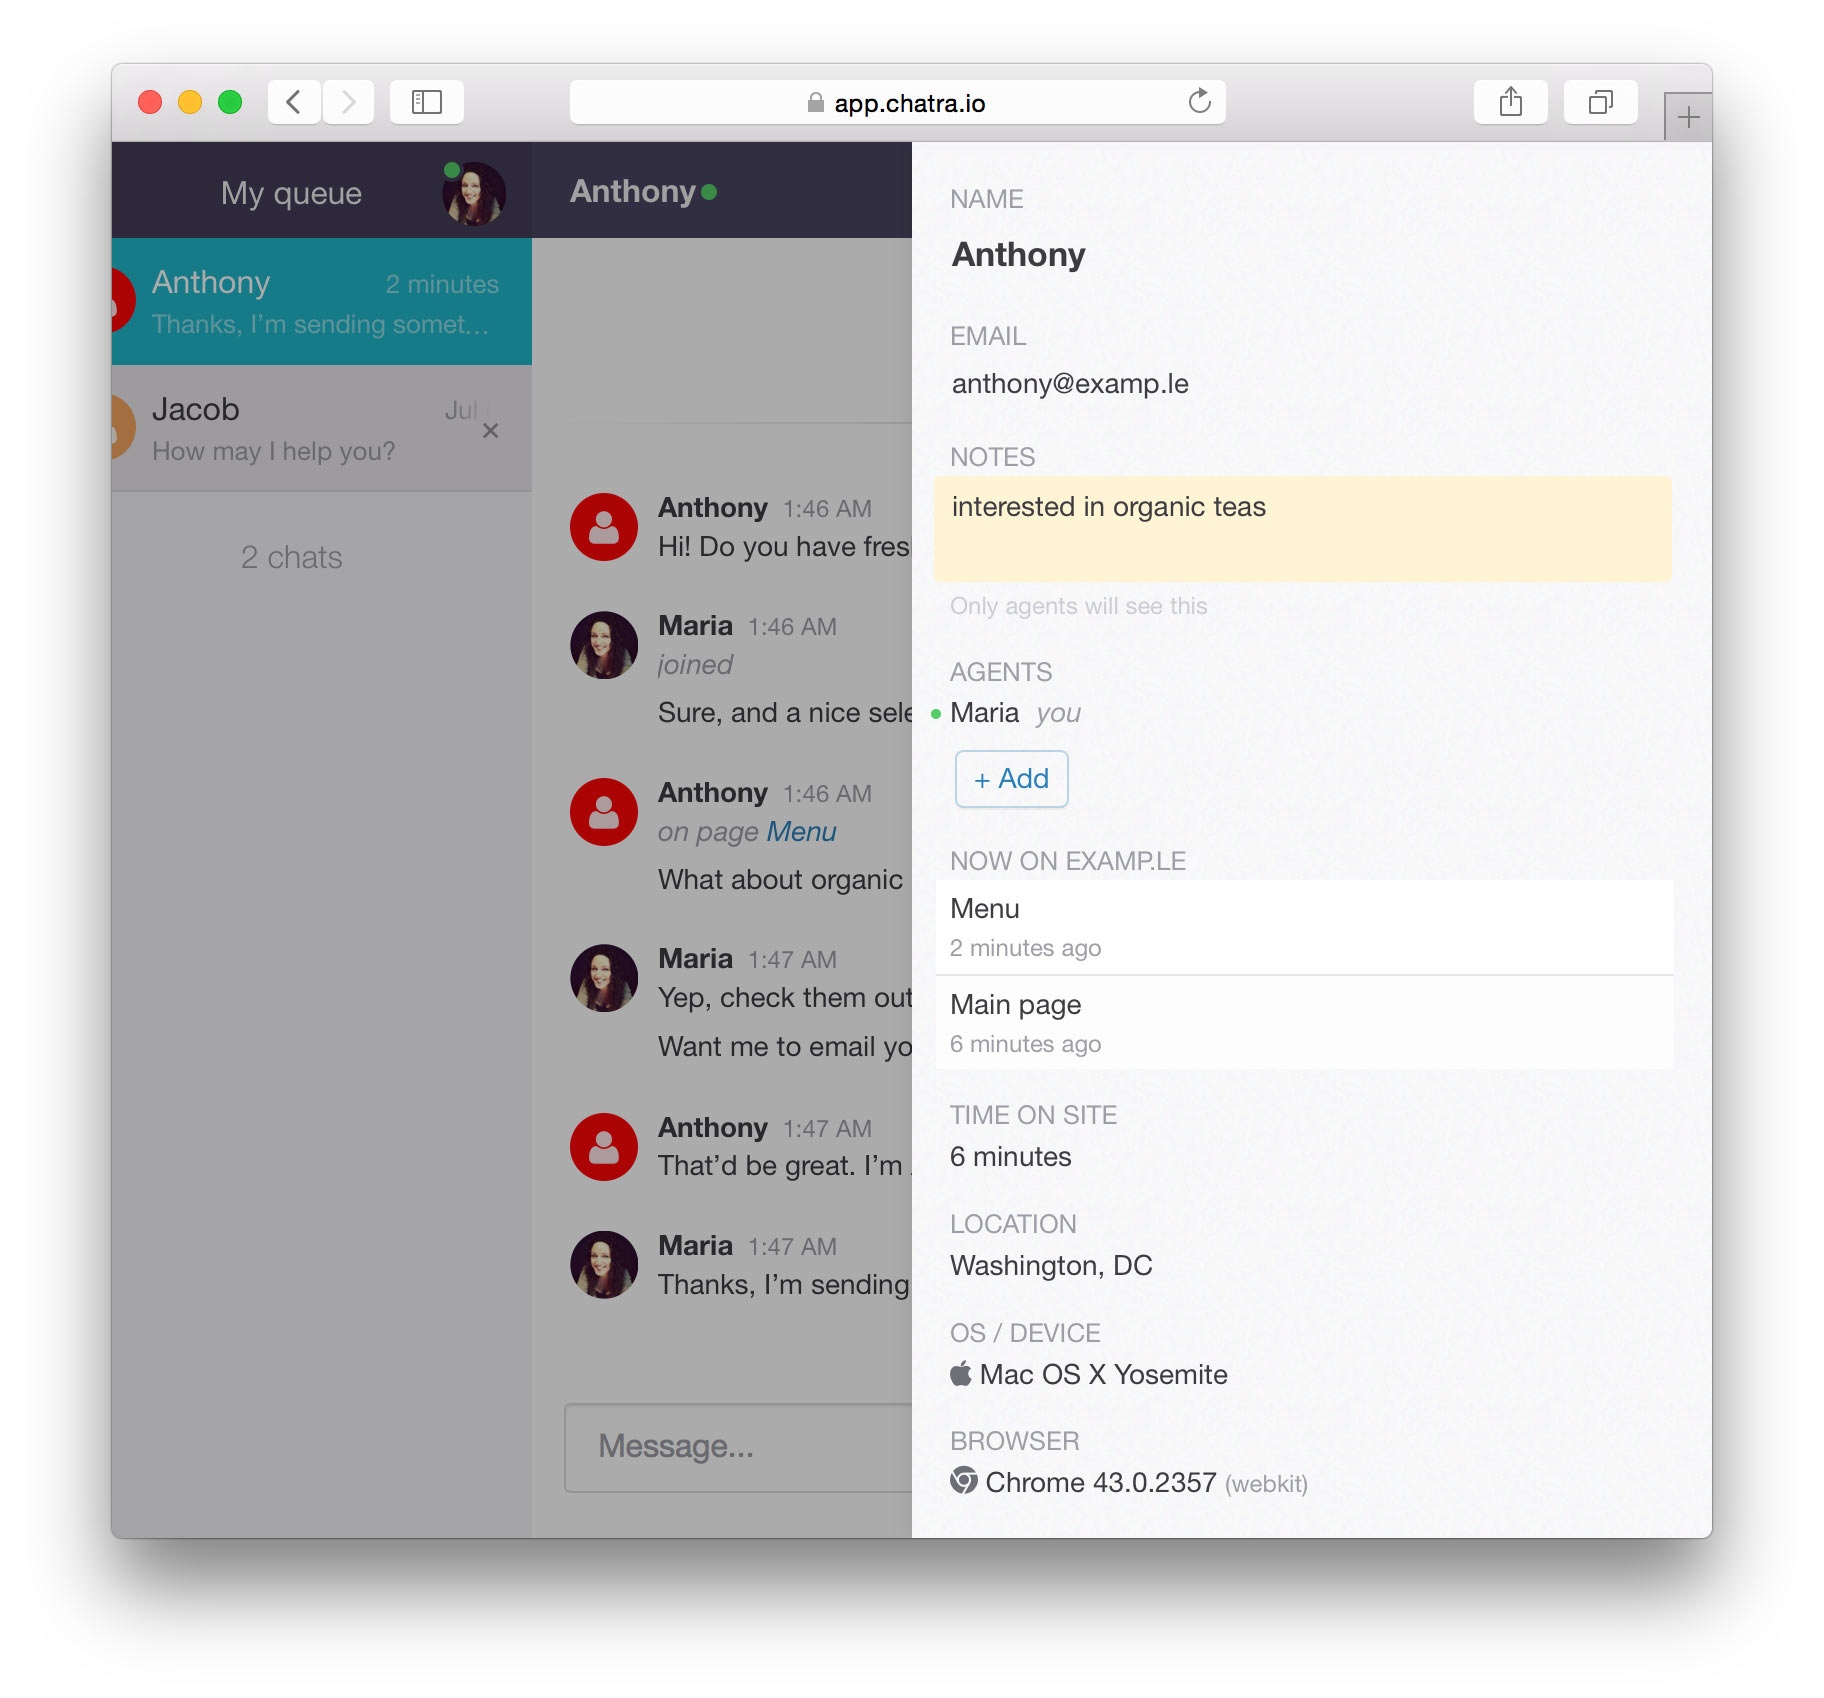
Visitor information — including their location, the page they’re on and the path they took there, as well what device and operating system they’re using — is shown in the right hand column. This is useful for addressing technical problems as well as making small talk about their local sports team!
Read your visitors’ minds
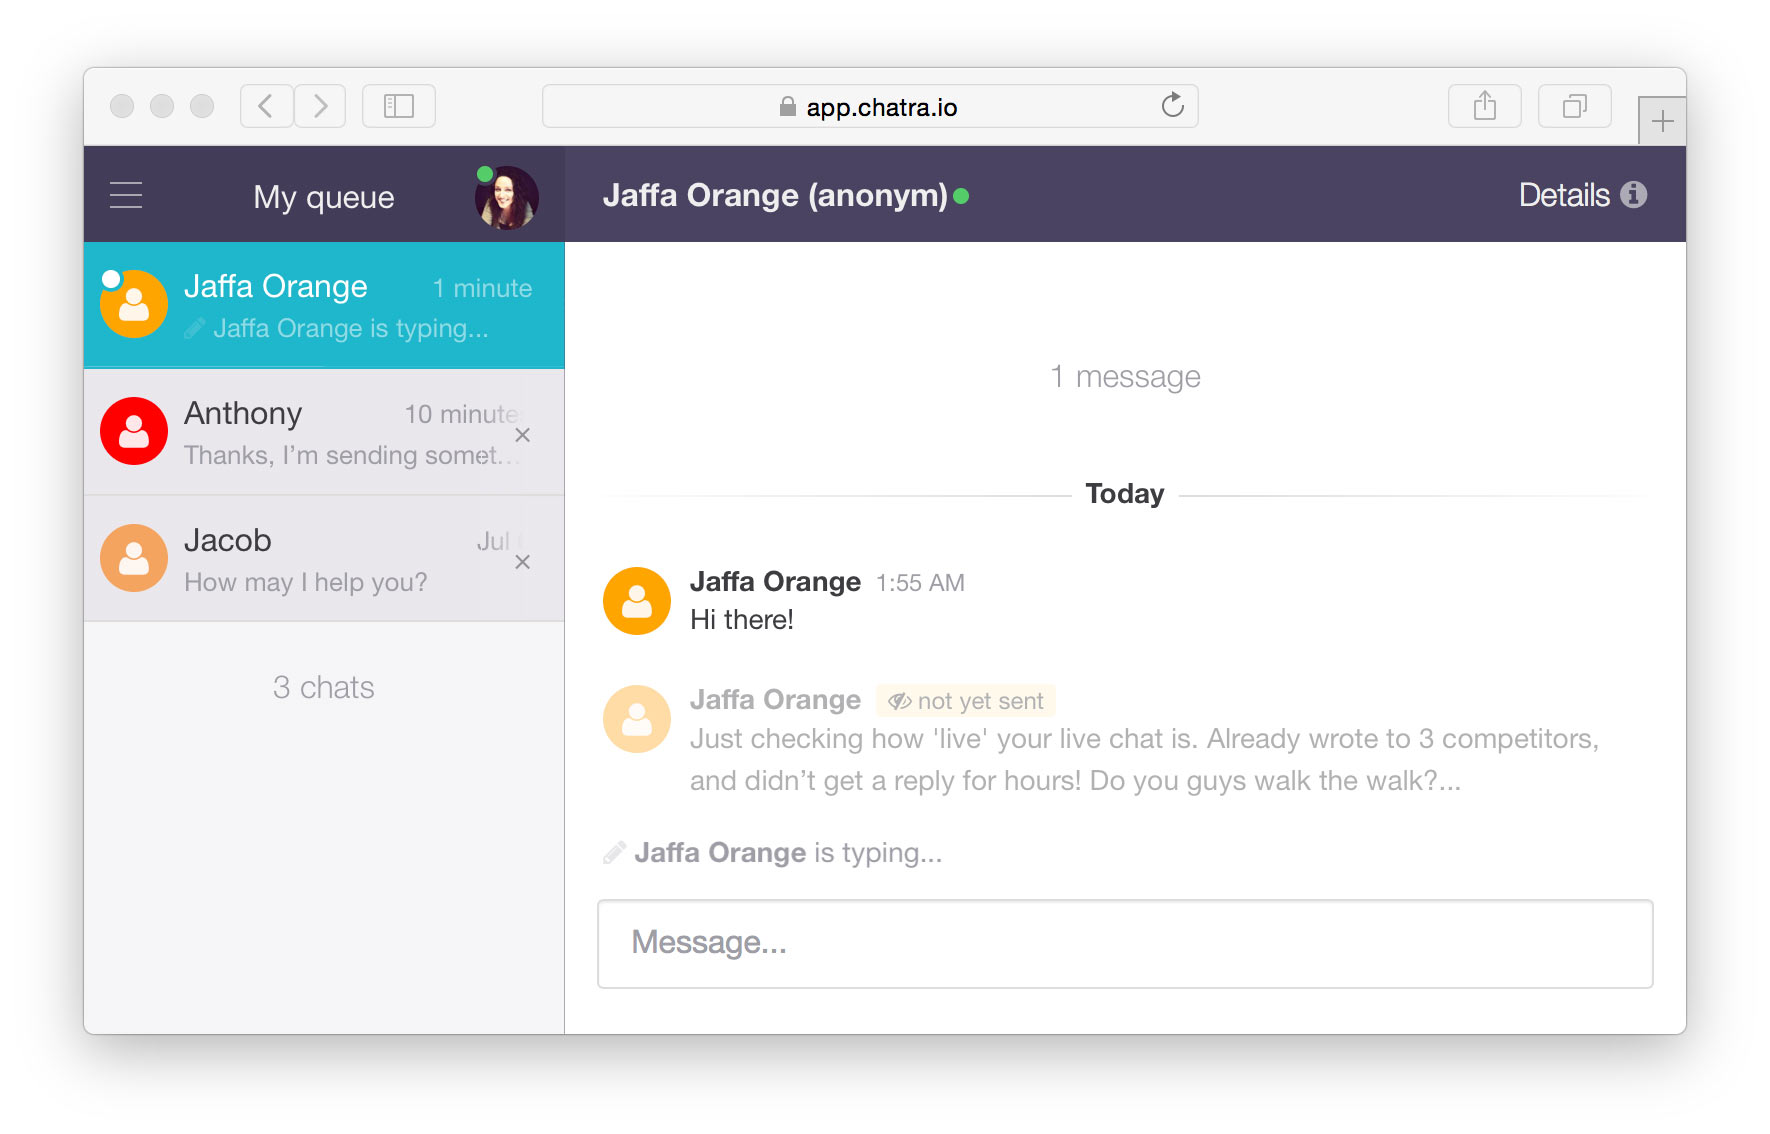
No need to wait ‘til the visitor finishes typing to find and prepare your answer. You’ll be able to save time and impress with the speed of your reactions.
Fast is good, telepathic is not! Wait until visitors have sent their message before you reply, as some people may not like the idea that you can see what they’re typing.
Correct typos
Noticed a typo? Hit ↑ to correct the last message or click the cogwheel icon that shows up on hover.
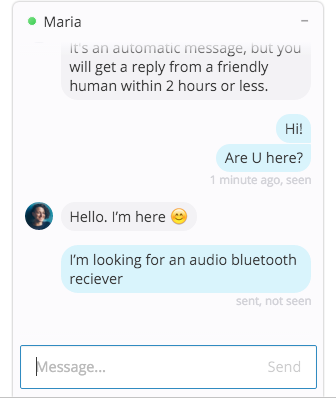
Check message status
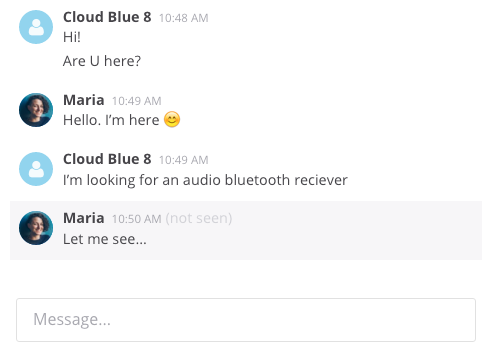
Both you and your visitors will see if messages have been seen or not. Impatient visitors will now know you aren’t ignoring their question, but simply haven’t read a message yet.
Write your own cliff notes
Found out a visitor’s name, email address or other relevant information? Want to make a note to look up something they asked about? Use the right hand column like a CRM to make notes so you, and other agents, can recognize them when they come back.
What’s next?
Now you know how to use Chatra effectively. All that’s left is to log in and start putting your new knowledge to good use.
Log in and try it yourself
